HDMI I/O (NV-32-H)
Use the HDMI I/O component to configure HDMI video and audio routing in Q-SYS.
Note: To learn about native HDMI distribution within the Q-SYS Ecosystem, see the Q-SYS Video 101 Training on the QSC website.
These Q-SYS devices support HDMI video and audio routing.
In this mode, the HDMI I/O component represents a local 3 x 2 HDMI video switcher with the ability to receive and locally display Mediacast streams. Q-SYS Shift Networked AV Streaming is not supported.
Mediacast Streaming
- Select a single incoming Mediacast stream from an NC Series or PTZ Series camera to display locally on HDMI AV Output 1. Display on HDMI AV Output 2 is not supported.
- Camera Mediacast streams are always in 16:9 aspect ratio and scaled to "stretch to fit" mode for displays that are not 16:9.
Local HDMI Switching
- Onboard HDMI switching is 3 x 1 @ 4K60 or 3 x 2 @ 1080p.
For NV-32-H (Core Capable) devices in Peripheral Mode or NV-32-H Network Video Endpoints, the HDMI I/O component represents a single NV-32-H device configured as an Encoder or Decoder for sending or receiving AV signals over the network.
Q-SYS Shift Networked AV Streaming
- An Encoder takes source HDMI AV signals and places them on the network in streams. Encoders can process a single stream up to 4K60 or three simultaneous streams up to 1080p60 each.
- A Decoder processes incoming network HDMI signals and sends them to a display. Decoders can process a single stream up to 4K60 or two simultaneous streams up to 1080p60 each.
Mediacast Streaming
- Select a single incoming Mediacast stream from an NC Series or PTZ Series camera to display on the Encoder or Decoder's local HDMI AV Output 1. Output 2 is not supported with Mediacast streams.
- Mediacast streaming is local to the NV-32-H device. You cannot stream Mediacast between Encoder AV Outputs and Decoder AV Inputs in your design.
- Camera Mediacast streams are always in 16:9 aspect ratio and scaled to "stretch to fit" mode for displays that are not 16:9.
Local HDMI Switching
- For Encoders, use HDMI Output 1 as a “courtesy monitor”, displaying any of the three locally connected HDMI sources at resolutions up to 4K60.
- For Decoders, toggle between network streams or locally connected HDMI sources (single 4K60 or dual 1080p60 sources).
- QSC supports the direct connection between NV Series Video Endpoints and HDMI sources and displays.
- The use of signal extension solutions (for example, HDBaseT extenders, HDMI distribution amps, and active/optical HDMI cables and keystones) in-line with NV Series HDMI ports may introduce handshake issues or signal attenuation-related issues. QSC does not test any configurations with these products.
- To maximize HDMI signal reliability, use Premium or Ultra High Speed certified cables.
Note: Each NV Series HDMI output supplies up to 120mA on the +5v signal line.
Note: The input and output pins shown depend on the Q-SYS hardware and component Properties.
Input Pins
 Mediacast Input n
The number of Mediacast inputs is configurable in Properties. Connect this pin directly to the Mediacast Output pin of the Status/Control (Cameras) component or, for designs with multiple Mediacast sources, to the Output pin of the Mediacast Router component.
 HDMI AV Input 1, 2, 3
Each pin represents one of the three HDMI inputs on the NV-32-H. Connect this pin to a Generic AV Source component HDMI AV Output pin.
Output Pins
HDMI AV Output 1, 2 
This pin outputs a selectable signal from any of the HDMI I/O inputs, including the AV inputs and local HDMI inputs. Connect this pin to a Generic HDMI Display HDMI AV Input pin. By default, a single HDMI AV output pin is exposed. However, if you configure the HDMI Output Mode component property to "HDMI 1 + HDMI 2", a second output pin is exposed.
Note: Each HDMI output supplies up to 120mA on the +5v signal line.
HDMI 1, 2 Channel 1, 2 
If enabled in the component Properties (HDMI Output Mode is set to "HDMI 1 + HDMI 2"), select the number of audio pins to expose – from 0 to 8 – for routing to other Q-SYS audio components, such as a network amplifier. This audio corresponds to the HDMI Output 1 or 2 source you select in the HDMI I/O control panel.
Tip: These pins automatically send audio for whatever HDMI video source is selected for display. No additional programming is required to align audio and video signals.
Input Pins
 Mediacast Input n
The number of Mediacast inputs is configurable in Properties. Connect this pin directly to the Mediacast Output pin of the Status/Control (Cameras) component or, for designs with multiple Mediacast sources, to the Output pin of the Mediacast Router component.
 HDMI AV Input 1, 2, 3
Each pin represents one of the three HDMI inputs on the NV-32-H. Connect this pin to a Generic AV Source component HDMI AV Output pin.
Output Pins
AV Output 1, 2, 3 
The AV Output pins send combined HDMI video and audio signals over the Q-LAN network. Each of the three outputs correspond to a respective HDMI AV Input pin – for example, AV Output 1 transmits the incoming HDMI signal from HDMI AV Input 1. Connect an AV Output pin to an AV Input pin on the HDMI I/O Decoder component.
HDMI AV Output 1 
If enabled in the component Properties (HDMI Output Mode is set to "HDMI 1"), this pin outputs a selectable signal from one of the three HDMI inputs on the NV-32-H. Connect this pin to a Generic HDMI Display HDMI AV Input pin.
Note: Each HDMI output supplies up to 120mA on the +5v signal line.
HDMI 1 Channel 1, 2 
If enabled in the component Properties (HDMI Output Mode is set to "HDMI 1"), select the number of audio pins to expose – from 0 to 8 – for routing to other Q-SYS audio components, such as a network amplifier. This audio corresponds to the HDMI Output 1 source you select in the Encoder control panel.
Input Pins
 AV Input 1, 2, 3
The AV Input pins receive the combined HDMI video and audio signals from the Q-LAN network. Connect an AV Input pin to an AV Output pin on the HDMI I/O Encoder component.
 Mediacast Input n
The number of Mediacast inputs is configurable in Properties. Connect this pin directly to the Mediacast Output pin of the Status/Control (Cameras) component or, for designs with multiple Mediacast sources, to the Output pin of the Mediacast Router component.
 HDMI AV Input 1, 2, 3
Each pin represents one of the three HDMI inputs on the NV-32-H. Connect this pin to a Generic AV Source component HDMI AV Output pin.
Output Pins
HDMI AV Output 1, 2 
This pin outputs a selectable signal from any of the HDMI I/O inputs, including the AV inputs and local HDMI inputs. Connect this pin to a Generic HDMI Display HDMI AV Input pin. By default, a single HDMI AV output pin is exposed. However, if you configure the HDMI Output Mode component property to "HDMI 1 + HDMI 2", a second output pin is exposed.
Note: Each HDMI output supplies up to 120mA on the +5v signal line.
HDMI 1, 2 Channel 1, 2 
If enabled in the component Properties (HDMI Output Mode is set to "HDMI 1 + HDMI 2"), select the number of audio pins to expose – from 0 to 8 – for routing to other Q-SYS audio components, such as a network amplifier. This audio corresponds to the HDMI Output 1 or 2 source you select in the Decoder control panel.
Tip: These pins automatically send audio for whatever HDMI video source is selected for display. No additional programming is required to align audio and video signals.
HDMI Source Examples
When the NV-32-H (Core Capable) is configured in Core Mode, the device serves not only as an integrated audio, video, and control processor (as with other Q-SYS Core processors) but also as a local HDMI switcher. In this example, the NV-32-H (Core Capable) accepts HDMI connections from three conference room user laptops and routes the HDMI signals to the conference room monitor.

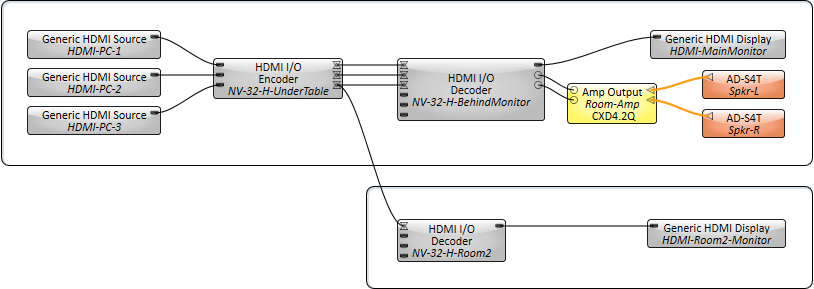
This example shows a typical conference room configuration. Three HDMI source signals (for example, computer HDMI audio and video) can be encoded by one NV-32-H network endpoint mounted under a conference room table. The signals are transmitted over the Q-LAN network and decoded by another NV-32-H connected to a wall-mounted HDMI display. Whatever network AV source selected in the Decoder is sent to the display, with amplification of two channels of audio from the selected source.

This example is similar to Example 1, except that a "courtesy" monitor is connected to the HDMI 1 output on the NV-32-H Encoder. This allows a presenter to select one of the HDMI sources for viewing on a separate monitor. For example, this would be useful for a lecturer to view the presented source on a small lectern monitor without having to turn around to see the main display.
Note: Audio from an Encoder's local HDMI 1 output can also be routed to Q-SYS audio components for processing in the Q-SYS Core's DSP. To enable HDMI and audio output pins on an Encoder, set the HDMI Output Mode property to "HDMI 1" and set the number of HDMI 1 Audio Pins.

Tip: You can also route audio directly from an HDMI source by enabling Breakaway Audio for that source. For more information, and to see an example, see Generic AV Source.
This example adds the ability to connect up to three local HDMI sources to the NV-32-H Decoder, such as Blu-ray players, network streaming devices, and similar. Users can thus select from six AV sources (three network, three local) to display in the room, with amplification of the selected source.

In this example, the room contains two HDMI displays. Each can display a separate network AV source. Audio from both sources is routed to a Matrix Mixer and is then amplified.
Note: To enable HDMI Output 2 pins on a Decoder and route separate AV streams to dual displays, set the HDMI Output Mode property to "HDMI 1 + HDMI 2".

Tip: You can also route audio to a display by exposing audio input pins for that display. This can be useful, for example, for inserting audio from a Q-SYS PA system (pages) for output on a display's internal speakers or a connected speaker bar. For more information, and to see an example, see Generic HDMI Display.
In this example, the primary room's NV-32-H is sending unicast streams on its AV Output 1 and 2 pins. However, AV Output 3 is sending a stream to both the NV-32-H in the primary room and a secondary location, thus making this a multicast stream. In the secondary location, the stream is decoded and output to an HDMI display. This location has no amplifier and speakers, so the stream audio is heard via the display's internal speakers or connected speaker bar.
Note: For more NV-32-H schematic examples showing different configurations for HDMI sources and displays, see Generic AV Source and Generic HDMI Display.
Mediacast and HDMI Source Examples
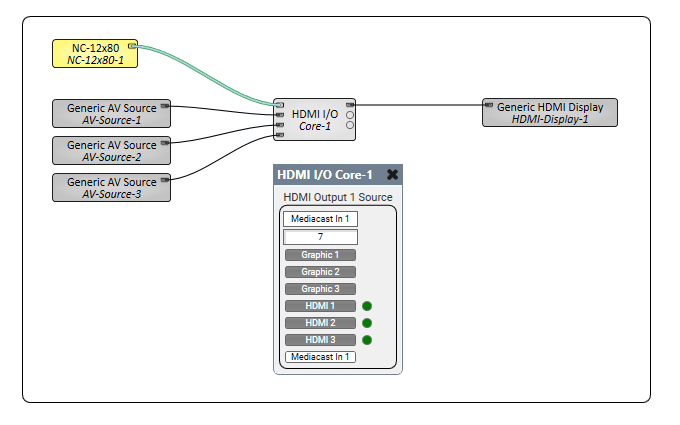
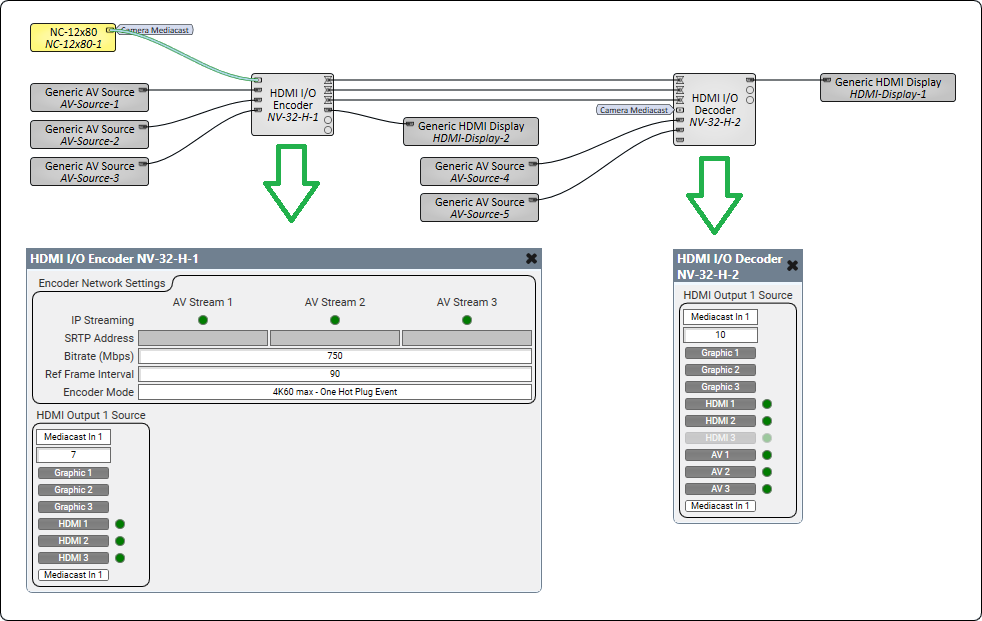
In this example, one Mediacast camera source and three local HDMI sources are wired to an NV-32-H (Core Capable) in Core Mode. Any of these sources is selectable for output to a connected HDMI display.
In this example:
-
A Mediacast camera source is selectable for display on both an Encoder's local HDMI Output 1 and a Decoder's HDMI Output 1.
-
Three HDMI devices connected to the Encoder are selectable on the Decoder as AV sources.
-
Two HDMI devices connected to the Decoder's local HDMI inputs are selectable as HDMI sources.
Tip: Camera Offline, Privacy, and Exiting Privacy graphics are displayed on the HDMI output when a Mediacast camera stream is selected for output.
This example is the same as Example 8, but with simultaneous Mediacast signal routing to three USB Video Bridges.
Tip: Mediacast sources can be routed to HDMI simultaneously with USB audio and video bridging with no impact to device performance.

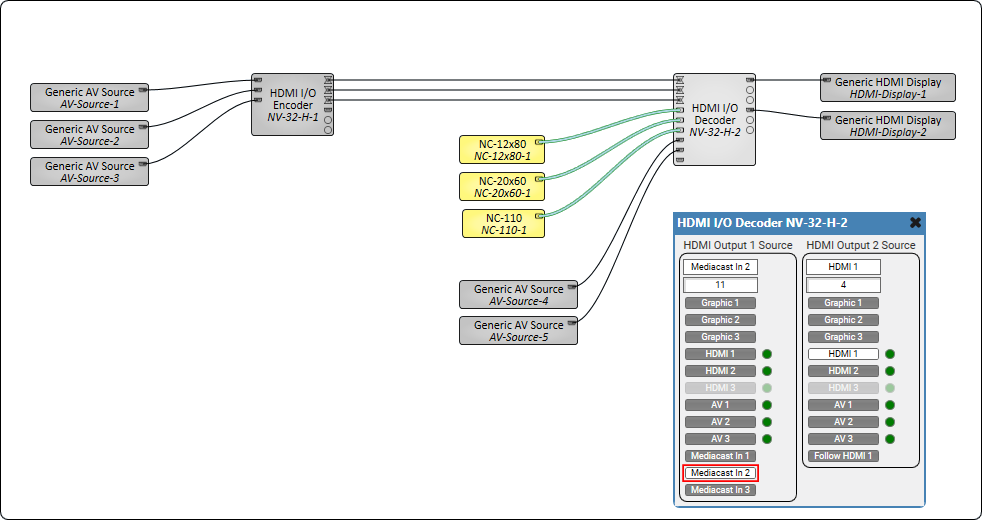
In this example, three Mediacast camera streams are selectable for the display connected to a Decoder, along with three AV streams and two local HDMI sources.
Note: HDMI Output 2 does not support Mediacast streams.
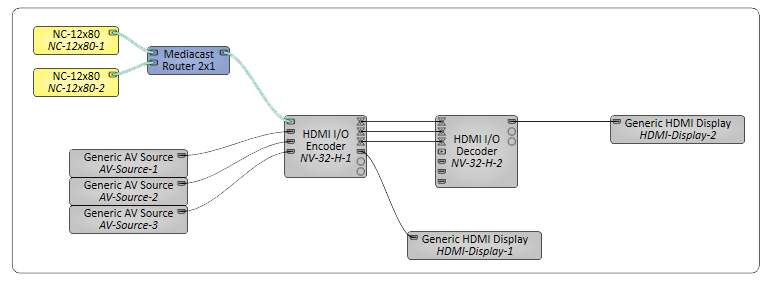
In this example, two Mediacast camera streams are selectable for the display connected to a Decoder. One Mediacast router switches camera streams into the Encoder HDMI I/O.
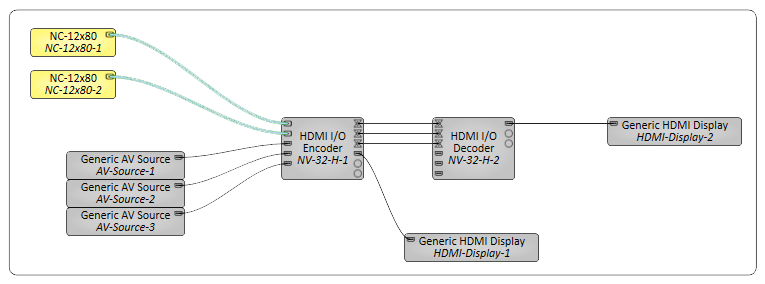
In this example, two Mediacast camera streams are selectable for the display connected to a Decoder. HDMI I/O Embedded Mediacast router switches cameras streams directly.
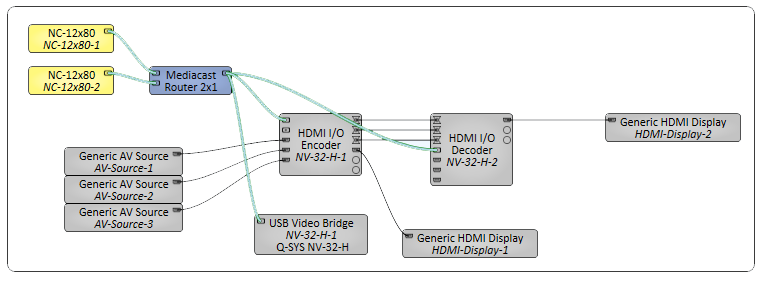
In this example, Mediacast router switches camera streams into the single Mediacast input of the Encoder HDMI I/O, Encoder USB Video Bridge, and Decoder HDMI I/O.
Note: Available properties depend on the Supported Q-SYS Hardware and mode, if applicable.
Core Properties
Name
The Name may contain ASCII letters 'a' through 'z' (case-insensitive), the digits '0' through '9', and the hyphen. Names cannot begin or end with a hyphen. No other symbols, punctuation characters, or blank spaces are permitted.
Location
User-defined name that groups the component with other components in the same physical location, or in the same organizational scheme.
Model
When the NV-32-H (Core Capable) is configured for Core Mode, this should always be set to 'NV-32-H (Core Mode)'.
External USB Audio
See External USB Audio Device In and External USB Audio Device Out. The default is 'Disabled'.
HDMI Output Mode
This property determines the functionality of the NV-32-H HDMI outputs.
- HDMI 1: (Default) Video and audio output is enabled for the HDMI 1 output connector.
- HDMI 1 + HDMI 2: Video and audio output is enabled for both the HDMI 1 and HDMI 2 output connectors. Each output can be assigned an independent source.
Note: When HDMI 1 + HDMI 2 mode is selected, source EDID files are forced to a maximum resolution of 1080p60.
HDMI 1, 2 Audio Pins
This property determines the number of exposed audio pins for the HDMI 1 and HDMI 2 outputs, from 0 to 8. The default is '2'. Set this number to match the number of audio channels from the HDMI source.
Source Index
Select how control indexes are determined for each NV-32-H streaming component in your design, including HDMI I/O (NV-32-H), Status (NV-32-H), and System Link. This affects how controls are referenced in scripting components, including Named Controls in Block Controller and Text Controller.
-
Auto: (Default) Components in existing designs upgraded to Q-SYS v9.2.0 and later will continue to use a 0-based index. New components use a 1-based index, which matches the functionality of other Q-SYS components.
-
0-Based: The component will use a 0-based index, meaning that control indexing starts at 0. This is useful for maintaining consistency with other components and for re-using control scripts.
-
1-Based: The component will use a 1-based index, meaning that control indexing starts at 1. This matches the functionality of other Q-SYS components.
For a control called "Select AV 1" in the control panel:
-
0-Based: The control would have an index value of 0. As in, hdmi.out.0.select.avh.0.
-
1-Based: The control would have an index value of 1. As in, hdmi.out.1.select.avh.1.
Mediacast
Input Count
Select the number of Mediacast Input pins, from 0 to 100 (1 is default). For more information, see Inputs and Outputs.
USB Bridging
Refer to these topics for USB bridging properties:
- USB Video Bridge
- USB Audio Bridge – Speakerphone / Sound Card In
- USB Audio Bridge – Speakerphone / Sound Card Out
Other Properties
Network Receive Buffer
Adds extra buffer time to the default maximum of 1 ms: Extra 1/3ms, Extra 2/3ms, or Extra 1ms.
Additional Network Receive Buffer time is useful in (rare) cases where the network latency through the network exceeds the default maximum. Additional network latency may be introduced by sub-optimal QoS functionality, some layer-3 routing implementations, long distances or large networks.
Network Video Endpoint Properties
Name
The Name may contain ASCII letters 'a' through 'z' (case-insensitive), the digits '0' through '9', and the hyphen. Names cannot begin or end with a hyphen. No other symbols, punctuation characters, or blank spaces are permitted.
Location
User-defined name that groups the component with other components in the same physical location, or in the same organizational scheme.
Is Required
When enabled, and the device is not found on the network, the device is reported as 'Missing', which is an error condition. This is the default behavior. When disabled, and the device is not found on the network, the device is reported as 'Not Present', which is not an error condition.
Dynamically Paired
Indicates that this virtual component can be paired with the same type of hardware without changing the network ID of the hardware or the name of this component. Refer to the Q-SYS Core Manager Dynamic Pairing topic for more information. The default is 'No'.
External USB Audio
See External USB Audio Device In and External USB Audio Device Out. The default is 'Disabled'.
Device Type
Select whether the NV-32-H functions as an Encoder (default) or Decoder.
AV IP Streaming
For Encoders only, this property determines the network streaming method for Q-LAN AV streams:
- Compiler Choice: (Default) Select this option to allow Q-SYS Designer Software to determine whether unicast (one-to-one) or multicast (one-to-many) is best for your configuration. This is the recommended option.
- Unicast: Select this option when your design contains one-to-one AV routing, meaning that each AV output pin in your design is connected to a single AV input pin.
- Multicast: Select this option when your design contains one-to-many AV routing, meaning that an AV output pin is connected to multiple AV input pins.
AV Input Count
For Decoders only, this property determines the number of exposed AV input pins, from 0 to 255. The default is '3'.
HDMI Output Mode
This property determines the functionality of the NV-32-H HDMI outputs. The choices depend on whether the HDMI I/O component is configured as an Encoder or Decoder.
- None: (Default) HDMI video and audio output is disabled.
- HDMI 1: HDMI video and audio output is enabled for the HDMI 1 output connector.
- HDMI 1: (Default) Video and audio output is enabled for the HDMI 1 output connector.
- HDMI 1 + HDMI 2: Video and audio output is enabled for both the HDMI 1 and HDMI 2 output connectors. Each output can be assigned an independent source.
Note: When HDMI 1 + HDMI 2 mode is selected, source EDID files are forced to a maximum resolution of 1080p60. This applies to local HDMI inputs on the Decoder and any Encoder HDMI inputs that are wired to the Decoder.
HDMI 1, 2 Audio Pins
This property determines the number of exposed audio pins for the HDMI 1 and HDMI 2 outputs, from 0 to 8. The default is '2'. Set this number to match the number of audio channels from the HDMI source. Note that Encoders do not support HDMI 2 output.
Source Index
Select how control indexes are determined for each NV-32-H streaming component in your design, including HDMI I/O (NV-32-H), Status (NV-32-H), and System Link. This affects how controls are referenced in scripting components, including Named Controls in Block Controller and Text Controller.
-
Auto: (Default) Components in existing designs upgraded to Q-SYS v9.2.0 and later will continue to use a 0-based index. New components use a 1-based index, which matches the functionality of other Q-SYS components.
-
0-Based: The component will use a 0-based index, meaning that control indexing starts at 0. This is useful for maintaining consistency with other components and for re-using control scripts.
-
1-Based: The component will use a 1-based index, meaning that control indexing starts at 1. This matches the functionality of other Q-SYS components.
For a control called "Select AV 1" in the control panel:
-
0-Based: The control would have an index value of 0. As in, hdmi.out.0.select.avh.0.
-
1-Based: The control would have an index value of 1. As in, hdmi.out.1.select.avh.1.
Mediacast
Input Count
Select the number of Mediacast Input pins, from 0 to 100 (1 is default). For more information, see Inputs and Outputs.
USB Bridging
Refer to these topics for USB bridging properties:
Note: Available controls depend on the Supported Q-SYS Hardware, mode, and whether the HDMI I/O component is configured as an Encoder or Decoder (if applicable).
HDMI Output 1, 2 Source
Select which sources to output through the Decoder's HDMI AV Output pins. The section for HDMI Output 2 Source only appears when the HDMI Output Mode component property is set to "HDMI 1 + HDMI 2". You can select a source using either the drop-down menu, numeric input, or trigger buttons. The Active HDMI LED indicates what sources are active and selectable.
- Graphic 1, 2, 3: Toggle a graphic to display that you assign in Q-SYS Core Manager. Numeric input values are 1, 2, and 3.
- HDMI 1, 2, 3: These inputs correspond to the sources connected to the HDMI AV Input pins 1, 2, 3. Numeric input values are 4, 5, and 6.
- Mediacast In n: (HDMI Output 1 Source only) These inputs correspond to the Mediacast sources (cameras) connected to the Mediacast Input pins. The number of selectable sources equals what is specified for the Mediacast > Input Count property. Numeric input values begin at 7.
- Follow H1: (HDMI Output 2 Source only) If the HDMI Output Mode property is set to "HDMI 1 + HDMI 2", this control appears for the HDMI Output 2 Source. When enabled, HDMI Output 2 uses whatever source is selected for HDMI Output 1. When enabled, the maximum resolution is 1080p60 for both outputs.
Mediacast Input
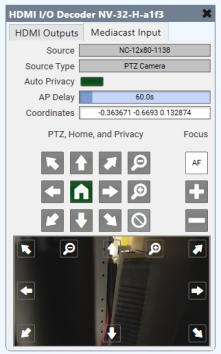
Source
Source indicates the name of the currently selected Mediacast source.

Source Type
Source Type indicates the type of currently selected Mediacast source.

Not all controls are supported by all camera models. When a design is running, controls are either not visible (Status/Control component) or grayed-out (Video Bridge component) if not supported by your camera model.
Note: Due to the wide variety of Q-SYS camera models and differing default values for camera controls, those default values are not indicated here. Use the Reset all Camera settings (Imaging, PTZ, and Focus) control in the Imaging tab to reveal the defaults for your camera model.
Pan / Tilt / Zoom
Pan, Tilt


Pan left or right (allows for 360° pan), tilt upward or downward. Click and release for small increments, or click and hold to tilt continually until the camera reaches the mechanical limits.
Pan/Tilt


(NC Series cameras only) Combination pan and tilt. Click and release for small increments, or click and hold to tilt continually until the camera reaches the mechanical limits.
Zoom


Zooms out or zooms in, giving you a wider or smaller angle of view. Click and release for small increments, or click and hold to zoom continually.
Coordinates

Positional coordinates are P T Z F: P=Pan, T=Tilt, Z= Zoom, and F=Focus, with Focus being optional. Each coordinate is separated by a space. A set of coordinates of 0 0 0 (default) puts the camera level, facing front, and zoomed fully out. Appending a fourth value for Focus forces the camera into Manual focus mode. Without a Focus value, Auto Focus (AF) is engaged. Refer to the Control Pins table for valid coordinate value ranges.
Tip: Copy and paste these coordinates into a Q-SYS Snapshot to create camera presets. In addition, you can select the coordinates and type in the desired position if you know it.
Note: The Focus coordinate is not supported by NC-110 cameras.
Home

The Home button returns the camera to the default Home position, or the position that was saved by the Save Home button.
Load Privacy

When engaged, the Load Privacy button recalls the privacy preset position as captured when the Save Privacy button was clicked. By default the camera is facing backwards and outputs a black video stream. When the button is disengaged, the camera returns to the position it was when the Load Privacy button was engaged. The Load Privacy button is disengaged when a coordinate is entered in the Coordinates field, or if a Q-SYS Snapshot is evoked.
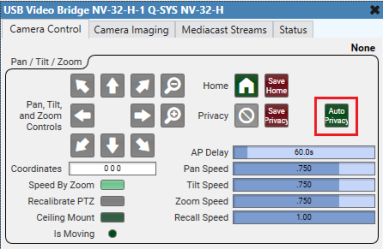
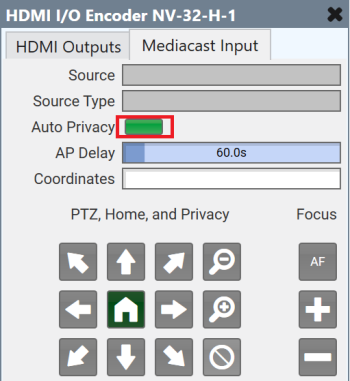
Auto Privacy

Tip: Auto privacy will not work with un-wired outputs on the Mediacast Router.
-
When on, cameras connected to the Mediacast Input automatically enter privacy mode until video is requested (Mediacast Input is selected), at which point the camera exits privacy mode and moves to the home position. When video is no longer requested, the camera returns to privacy mode by recalibrating PTZ and recalling the specified privacy coordinates.
-
When off, cameras do not automatically enter privacy mode when no video is requested. When manually entering privacy mode, the PTZ is not recalibrated.
Note: If the Mediacast Input is connected to a Mediacast Router, the router automatically switches to the Camera 1 input. This is by design, and allows the room to be left in a known good configuration. Connect your room's "default" camera to the router's Camera 1 input.
AP Delay
Auto Privacy Delay, from 1 to 600 seconds (default is 60). After video is turned off (or USB disconnected) and after the AP Delay timeout period, the camera returns to the privacy mode again.
Recall Speed
Adjust the speed of motor movements when recalling PTZ coordinates, such as when loading a saved Snapshot, from 0 to 1.00 (default is 1.00). Use your mouse to drag the slider or enter a number.
Focus
Note: Focus controls are not applicable to NC-110 cameras.
Auto Focus

Toggles Auto Focus on or off (default is 'On'). Auto Focus is turned off when one of the Manual focus buttons is clicked.
Focus In, Focus Out


The Focus In button changes the focus mode to Manual and pushes the focal point toward the background of the shot. Objects in the foreground are less likely to be in focus, objects in the background are more likely to be in focus.
The Focus Out button changes the focus mode to Manual and pushes the focal point toward the foreground in the shot. Objects in the foreground are more likely to be in focus, objects in the background are less like to be in focus.
Note: When you first press Focus In or Focus Out, the camera transitions from Auto Focus mode to Manual Focus mode. After this transition, a subsequent press of Focus In or Focus Out affects the focus value. If you wish to adjust focus immediately when coming from Auto Focus mode, then double-click the Focus In or Focus Out buttons.
Preview
The Preview screen shows the camera's current view and updates once per second. The screen includes controls for Pan, Tilt, and Zoom as documented in Pan / Tilt / Zoom.
Note: TSC Series touch screens can accommodate two or three Preview images on an single UCI before its operation and controls become sluggish.
Auto Privacy
You have fully functional Auto Privacy behavior regardless of the wired endpoint. For proper Auto Privacy functionality, you must enable Auto Privacy at every wired Mediacast endpoint:
USB Video Bridges AP Delay time is triggered by USB inactivity.
Mediacast to HDMI AP Delay timer is triggered by Mediacast Input unselecting. If the source selection changes to any other type, AP Delay time will be triggered. HDMI output power state has no impact on Auto Privacy.
It is highly recommended that you set up AP Delay to the same value for all your endpoints. Auto Privacy will only trigger globally when all AP Delays have expired. For example: If you have Endpoint A AP Delay = 60s, and Endpoint B AP Delay =10s, and both Endpoints are inactive, AP will not trigger until 60s (the longest and last delay required to expire).
Note: When using Auto Privacy, understanding the basic flow for entering privacy versus exiting is important. Privacy and Home positions are managed at the source camera. Auto Privacy is a mechanism to automatically control home and privacy states for like-wired cameras.
Entering Privacy
-
Stream is active - Mediacast endpoint is using camera stream
-
Stream inactivates - Mediacast endpoint stops using camera stream
-
AP Delay time starts
-
AP Delay time expires
-
Privacy camera graphics are triggered
-
Camera recalibrates PTZ then recalibrates focus
-
Camera enters privacy position
Exiting Privacy
-
Stream is inactive - Mediacast endpoint is not using camera stream, camera is in privacy position, camera graphics show Privacy
-
Stream activates - Mediacast endpoint starts using camera stream
-
Exiting Privacy graphic shows
-
If external Mediacast router, router input is reset to Input 1
-
All Wired camera recall their home positions
-
When camera has successfully recalled its home position, exiting privacy graphics transitions to live camera video
Encoder Network Settings
IP Streaming
LED indicates whether the Encoder is actively transmitting AV audio and video data to a Decoder via SRTP on the Q-LAN network. This applies to both unicast or multicast streams.
SRTP Address
Displays the IP address that the Encoder is using to send AV network audio and video streams directly to Decoders:
- For unicast streams, this is the Encoder's IP address.
- For multicast streams, this is the multicast address assigned in Core Manager.
Bitrate (Mbps)
Specify the maximum average network video bitrate the Encoder can use to send AV streams to Decoders, from 50 to 800. The default is 750.
Lower bitrates consume less network bandwidth, but at the expense of compromised video quality during fast motion and transitions. For acceptable video quality:
- 4K60 stream – set the bitrate to at least 650 Mbps.
- 1080p streams – set to the bitrate so that each stream can use at least 250 Mbps.
Note: The Bitrate value is shared across all AV streams. For example, if you set the Bitrate to 600, the first AV stream can use a maximum of 600 Mbps. If a second stream becomes active, both streams can use 300 Mbps. If a third stream becomes active, each stream can use 200 Mbps.
Ref Frame Interval
This value determines how often video artifacts introduced by network errors are eliminated in the video stream. The value, between 90 and 255, is the number of video frames before a complete refresh occurs. The default is 90. A longer interval results in a lower video bitrate (thus consuming less network bandwidth), but at the expense of video artifacts persisting during the interval.
Encoder Mode
This property determines the maximum allowed AV stream resolution and what happens when the Encoder video streaming capabilities are exceeded.
- 4K60 max - One Hot Plug Event: (Default) This option allows a maximum stream resolution of 4K60. However, because an Encoder is limited to processing a single stream at resolutions above 1080p60, a request from a Decoder to process an additional AV stream on another input triggers a "hot plug event": Any Encoder input EDID with a resolution greater than 1080p60 is automatically re-negotiated down to 1080p60 maximum, thus allowing the Encoder to provide up to three streams. When this occurs, there is a momentary disruption of video processing across all AV streams. (This negotiation and disruption mimics what occurs when unplugging and plugging back in an HDMI cable, hence the term.) When all AV inputs become idle, the source EDIDs then reset to allow resolutions greater than 1080p60 again.
- 1080p60 max - No Hot Plug Events: This option limits all streams to 1080p60 maximum. Because an Encoder can process three simultaneous streams up to 1080p60, there is no EDID re-negotiation when a Decoder requests subsequent streams.
HDMI Output 1 Source
This section only appears when the HDMI Output Mode component property is set to "HDMI 1". Select which source to output through the Encoder's HDMI AV Output 1 pin. You can select a source using either the drop-down menu, numeric input, or trigger buttons. The Active HDMI LED indicates what sources are active and selectable.
- Graphic 1, 2, 3: Toggle a graphic to display that you assign in Q-SYS Core Manager. Numeric input values are 1, 2, and 3.
- HDMI 1, 2, 3: These inputs correspond to the sources connected to the HDMI AV Input pins 1, 2, 3. Numeric input values are 4, 5, and 6.
- Mediacast In n: These inputs correspond to the Mediacast sources (cameras) connected to the Mediacast Input pins. The number of selectable sources equals what is specified for the Mediacast > Input Count property. Numeric input values begin at 7.
Mediacast Input

Source
Source indicates the name of the currently selected Mediacast source.

Source Type
Source Type indicates the type of currently selected Mediacast source.

Not all controls are supported by all camera models. When a design is running, controls are either not visible (Status/Control component) or grayed-out (Video Bridge component) if not supported by your camera model.
Note: Due to the wide variety of Q-SYS camera models and differing default values for camera controls, those default values are not indicated here. Use the Reset all Camera settings (Imaging, PTZ, and Focus) control in the Imaging tab to reveal the defaults for your camera model.
Pan / Tilt / Zoom
Pan, Tilt


Pan left or right (allows for 360° pan), tilt upward or downward. Click and release for small increments, or click and hold to tilt continually until the camera reaches the mechanical limits.
Pan/Tilt


(NC Series cameras only) Combination pan and tilt. Click and release for small increments, or click and hold to tilt continually until the camera reaches the mechanical limits.
Zoom


Zooms out or zooms in, giving you a wider or smaller angle of view. Click and release for small increments, or click and hold to zoom continually.
Coordinates

Positional coordinates are P T Z F: P=Pan, T=Tilt, Z= Zoom, and F=Focus, with Focus being optional. Each coordinate is separated by a space. A set of coordinates of 0 0 0 (default) puts the camera level, facing front, and zoomed fully out. Appending a fourth value for Focus forces the camera into Manual focus mode. Without a Focus value, Auto Focus (AF) is engaged. Refer to the Control Pins table for valid coordinate value ranges.
Tip: Copy and paste these coordinates into a Q-SYS Snapshot to create camera presets. In addition, you can select the coordinates and type in the desired position if you know it.
Note: The Focus coordinate is not supported by NC-110 cameras.
Home

The Home button returns the camera to the default Home position, or the position that was saved by the Save Home button.
Load Privacy

When engaged, the Load Privacy button recalls the privacy preset position as captured when the Save Privacy button was clicked. By default the camera is facing backwards and outputs a black video stream. When the button is disengaged, the camera returns to the position it was when the Load Privacy button was engaged. The Load Privacy button is disengaged when a coordinate is entered in the Coordinates field, or if a Q-SYS Snapshot is evoked.
Auto Privacy

Tip: Auto privacy will not work with un-wired outputs on the Mediacast Router.
-
When on, cameras connected to the Mediacast Input automatically enter privacy mode until video is requested (Mediacast Input is selected), at which point the camera exits privacy mode and moves to the home position. When video is no longer requested, the camera returns to privacy mode by recalibrating PTZ and recalling the specified privacy coordinates.
-
When off, cameras do not automatically enter privacy mode when no video is requested. When manually entering privacy mode, the PTZ is not recalibrated.
Note: If the Mediacast Input is connected to a Mediacast Router, the router automatically switches to the Camera 1 input. This is by design, and allows the room to be left in a known good configuration. Connect your room's "default" camera to the router's Camera 1 input.
AP Delay
Auto Privacy Delay, from 1 to 600 seconds (default is 60). After video is turned off (or USB disconnected) and after the AP Delay timeout period, the camera returns to the privacy mode again.
Recall Speed
Adjust the speed of motor movements when recalling PTZ coordinates, such as when loading a saved Snapshot, from 0 to 1.00 (default is 1.00). Use your mouse to drag the slider or enter a number.
Focus
Note: Focus controls are not applicable to NC-110 cameras.
Auto Focus

Toggles Auto Focus on or off (default is 'On'). Auto Focus is turned off when one of the Manual focus buttons is clicked.
Focus In, Focus Out


The Focus In button changes the focus mode to Manual and pushes the focal point toward the background of the shot. Objects in the foreground are less likely to be in focus, objects in the background are more likely to be in focus.
The Focus Out button changes the focus mode to Manual and pushes the focal point toward the foreground in the shot. Objects in the foreground are more likely to be in focus, objects in the background are less like to be in focus.
Note: When you first press Focus In or Focus Out, the camera transitions from Auto Focus mode to Manual Focus mode. After this transition, a subsequent press of Focus In or Focus Out affects the focus value. If you wish to adjust focus immediately when coming from Auto Focus mode, then double-click the Focus In or Focus Out buttons.
Preview
The Preview screen shows the camera's current view and updates once per second. The screen includes controls for Pan, Tilt, and Zoom as documented in Pan / Tilt / Zoom.
Note: TSC Series touch screens can accommodate two or three Preview images on an single UCI before its operation and controls become sluggish.
Auto Privacy
You have fully functional Auto Privacy behavior regardless of the wired endpoint. For proper Auto Privacy functionality, you must enable Auto Privacy at every wired Mediacast endpoint:
USB Video Bridges AP Delay time is triggered by USB inactivity.
Mediacast to HDMI AP Delay timer is triggered by Mediacast Input unselecting. If the source selection changes to any other type, AP Delay time will be triggered. HDMI output power state has no impact on Auto Privacy.
It is highly recommended that you set up AP Delay to the same value for all your endpoints. Auto Privacy will only trigger globally when all AP Delays have expired. For example: If you have Endpoint A AP Delay = 60s, and Endpoint B AP Delay =10s, and both Endpoints are inactive, AP will not trigger until 60s (the longest and last delay required to expire).
Note: When using Auto Privacy, understanding the basic flow for entering privacy versus exiting is important. Privacy and Home positions are managed at the source camera. Auto Privacy is a mechanism to automatically control home and privacy states for like-wired cameras.
Entering Privacy
-
Stream is active - Mediacast endpoint is using camera stream
-
Stream inactivates - Mediacast endpoint stops using camera stream
-
AP Delay time starts
-
AP Delay time expires
-
Privacy camera graphics are triggered
-
Camera recalibrates PTZ then recalibrates focus
-
Camera enters privacy position
Exiting Privacy
-
Stream is inactive - Mediacast endpoint is not using camera stream, camera is in privacy position, camera graphics show Privacy
-
Stream activates - Mediacast endpoint starts using camera stream
-
Exiting Privacy graphic shows
-
If external Mediacast router, router input is reset to Input 1
-
All Wired camera recall their home positions
-
When camera has successfully recalled its home position, exiting privacy graphics transitions to live camera video
HDMI Outputs
Select which sources to output through the Decoder's HDMI AV Output pins. The section for HDMI Output 2 Source only appears when the HDMI Output Mode component property is set to "HDMI 1 + HDMI 2". You can select a source using either the drop-down menu, numeric input, or trigger buttons. The Active AV LED indicates what sources are active and selectable.
- Graphic 1, 2, 3: Toggle a graphic to display that you assign in Q-SYS Core Manager. Numeric input values are 1, 2, and 3.
- HDMI 1, 2, 3: These inputs correspond to the sources connected to the HDMI AV Input pins 1, 2, 3. Numeric input values are 4, 5, and 6.
- AV 1 - n: These inputs correspond to the sources connected to the AV Input pins, where n is the value specified for the AV Input Count property. Numeric input values range from 7 to 9, depending on what is specified for the AV Input Count property.
- Mediacast In n: (HDMI Output 1 Source only) These inputs correspond to the Mediacast sources (cameras) connected to the Mediacast Input pins. The number of selectable sources equals what is specified for the Mediacast > Input Count property. Numeric input values range from 8 to 10, depending on what is specified for the AV Input Count and Mediacast Input Count properties.
- Follow H1: (HDMI Output 2 Source only) If the HDMI Output Mode property is set to "HDMI 1 + HDMI 2", this control appears for the HDMI Output 2 Source. When enabled, HDMI Output 2 uses whatever source is selected for HDMI Output 1. When enabled, the maximum resolution is 1080p60 for both outputs. Its numeric input value is one count after the last AV input value.
Mediacast Input

Source
Source indicates the name of the currently selected Mediacast source.

Source Type
Source Type indicates the type of currently selected Mediacast source.

Not all controls are supported by all camera models. When a design is running, controls are either not visible (Status/Control component) or grayed-out (Video Bridge component) if not supported by your camera model.
Note: Due to the wide variety of Q-SYS camera models and differing default values for camera controls, those default values are not indicated here. Use the Reset all Camera settings (Imaging, PTZ, and Focus) control in the Imaging tab to reveal the defaults for your camera model.
Pan / Tilt / Zoom
Pan, Tilt


Pan left or right (allows for 360° pan), tilt upward or downward. Click and release for small increments, or click and hold to tilt continually until the camera reaches the mechanical limits.
Pan/Tilt


(NC Series cameras only) Combination pan and tilt. Click and release for small increments, or click and hold to tilt continually until the camera reaches the mechanical limits.
Zoom


Zooms out or zooms in, giving you a wider or smaller angle of view. Click and release for small increments, or click and hold to zoom continually.
Coordinates

Positional coordinates are P T Z F: P=Pan, T=Tilt, Z= Zoom, and F=Focus, with Focus being optional. Each coordinate is separated by a space. A set of coordinates of 0 0 0 (default) puts the camera level, facing front, and zoomed fully out. Appending a fourth value for Focus forces the camera into Manual focus mode. Without a Focus value, Auto Focus (AF) is engaged. Refer to the Control Pins table for valid coordinate value ranges.
Tip: Copy and paste these coordinates into a Q-SYS Snapshot to create camera presets. In addition, you can select the coordinates and type in the desired position if you know it.
Note: The Focus coordinate is not supported by NC-110 cameras.
Home

The Home button returns the camera to the default Home position, or the position that was saved by the Save Home button.
Load Privacy

When engaged, the Load Privacy button recalls the privacy preset position as captured when the Save Privacy button was clicked. By default the camera is facing backwards and outputs a black video stream. When the button is disengaged, the camera returns to the position it was when the Load Privacy button was engaged. The Load Privacy button is disengaged when a coordinate is entered in the Coordinates field, or if a Q-SYS Snapshot is evoked.
Auto Privacy

Tip: Auto privacy will not work with un-wired outputs on the Mediacast Router.
-
When on, cameras connected to the Mediacast Input automatically enter privacy mode until video is requested (Mediacast Input is selected), at which point the camera exits privacy mode and moves to the home position. When video is no longer requested, the camera returns to privacy mode by recalibrating PTZ and recalling the specified privacy coordinates.
-
When off, cameras do not automatically enter privacy mode when no video is requested. When manually entering privacy mode, the PTZ is not recalibrated.
Note: If the Mediacast Input is connected to a Mediacast Router, the router automatically switches to the Camera 1 input. This is by design, and allows the room to be left in a known good configuration. Connect your room's "default" camera to the router's Camera 1 input.
AP Delay
Auto Privacy Delay, from 1 to 600 seconds (default is 60). After video is turned off (or USB disconnected) and after the AP Delay timeout period, the camera returns to the privacy mode again.
Recall Speed
Adjust the speed of motor movements when recalling PTZ coordinates, such as when loading a saved Snapshot, from 0 to 1.00 (default is 1.00). Use your mouse to drag the slider or enter a number.
Focus
Note: Focus controls are not applicable to NC-110 cameras.
Auto Focus

Toggles Auto Focus on or off (default is 'On'). Auto Focus is turned off when one of the Manual focus buttons is clicked.
Focus In, Focus Out


The Focus In button changes the focus mode to Manual and pushes the focal point toward the background of the shot. Objects in the foreground are less likely to be in focus, objects in the background are more likely to be in focus.
The Focus Out button changes the focus mode to Manual and pushes the focal point toward the foreground in the shot. Objects in the foreground are more likely to be in focus, objects in the background are less like to be in focus.
Note: When you first press Focus In or Focus Out, the camera transitions from Auto Focus mode to Manual Focus mode. After this transition, a subsequent press of Focus In or Focus Out affects the focus value. If you wish to adjust focus immediately when coming from Auto Focus mode, then double-click the Focus In or Focus Out buttons.
Preview
The Preview screen shows the camera's current view and updates once per second. The screen includes controls for Pan, Tilt, and Zoom as documented in Pan / Tilt / Zoom.
Note: TSC Series touch screens can accommodate two or three Preview images on an single UCI before its operation and controls become sluggish.
Auto Privacy
You have fully functional Auto Privacy behavior regardless of the wired endpoint. For proper Auto Privacy functionality, you must enable Auto Privacy at every wired Mediacast endpoint:
USB Video Bridges AP Delay time is triggered by USB inactivity.
Mediacast to HDMI AP Delay timer is triggered by Mediacast Input unselecting. If the source selection changes to any other type, AP Delay time will be triggered. HDMI output power state has no impact on Auto Privacy.
It is highly recommended that you set up AP Delay to the same value for all your endpoints. Auto Privacy will only trigger globally when all AP Delays have expired. For example: If you have Endpoint A AP Delay = 60s, and Endpoint B AP Delay =10s, and both Endpoints are inactive, AP will not trigger until 60s (the longest and last delay required to expire).
Note: When using Auto Privacy, understanding the basic flow for entering privacy versus exiting is important. Privacy and Home positions are managed at the source camera. Auto Privacy is a mechanism to automatically control home and privacy states for like-wired cameras.
Entering Privacy
-
Stream is active - Mediacast endpoint is using camera stream
-
Stream inactivates - Mediacast endpoint stops using camera stream
-
AP Delay time starts
-
AP Delay time expires
-
Privacy camera graphics are triggered
-
Camera recalibrates PTZ then recalibrates focus
-
Camera enters privacy position
Exiting Privacy
-
Stream is inactive - Mediacast endpoint is not using camera stream, camera is in privacy position, camera graphics show Privacy
-
Stream activates - Mediacast endpoint starts using camera stream
-
Exiting Privacy graphic shows
-
If external Mediacast router, router input is reset to Input 1
-
All Wired camera recall their home positions
-
When camera has successfully recalled its home position, exiting privacy graphics transitions to live camera video
Note: Available controls depend on the Supported Q-SYS Hardware, mode, and whether the HDMI I/O component is configured as an Encoder or Decoder (if applicable).
|
Pin Name |
Value |
String |
Position |
Pins Available |
|---|---|---|---|---|
|
Output 1, 2 |
||||
|
Active |
||||
|
HDMI 1, 2, 3 |
0 1 |
false true |
0 1 |
Output |
|
Select |
||||
|
Follow HDMI Output 1 |
0 1 |
false true |
0 1 |
Input / Output |
|
Graphic 1, 2, 3 |
0 1 |
false true |
0 1 |
Input / Output |
|
HDMI 1, 2, 3 |
0 1 |
false true |
0 1 |
Input / Output |
|
Mediacast In n |
0 1 |
false true |
0 1 |
Input / Output |
|
Select by Name |
- |
Graphic n HDMI n Follow H1 |
- |
Input / Output |
|
Select by Number |
n (1 to n) |
- | - |
Input / Output |
|
Pin Name |
Value |
String |
Position |
Pins Available |
|---|---|---|---|---|
|
Network |
||||
|
Encoder Mode |
- |
4K60 max - One Hot Plug Event 1080p60 max - No Hot Plug Events |
- |
Input / Output |
|
Ref Frame Interval |
5 to 255 |
- |
0.000 to 1.00 |
Input / Output |
|
Video Bitrate |
50 to 800 |
- |
0.000 to 1.00 |
Input / Output |
|
Input 1, 2, 3 |
||||
|
SRTP Address |
(text) |
Output |
||
|
Streaming |
0 1 |
false true |
0 1 |
Output |
|
Output 1 |
||||
|
Select by Name |
- |
Graphic n HDMI n |
- |
Input / Output |
|
Select by Number |
n (1 to n) |
- | - |
Input / Output |
|
Active |
||||
|
HDMI 1, 2, 3 |
0 1 |
false true |
0 1 |
Output |
|
Select |
||||
|
Graphic 1, 2, 3 |
0 1 |
false true |
0 1 |
Input / Output |
|
HDMI 1, 2, 3 |
0 1 |
false true |
0 1 |
Input / Output |
|
Mediacast In n |
0 1 |
false true |
0 1 |
Input / Output |
|
Pin Name |
Value |
String |
Position |
Pins Available |
|---|---|---|---|---|
|
Output 1, 2 |
||||
|
Select by Name |
- |
Graphic n HDMI n AV n Follow H1 |
- |
Input / Output |
|
Select by Number |
n (1 to n) |
- | - |
Input / Output |
|
Active |
||||
|
AV 1, 2, 3 |
0 1 |
false true |
0 1 |
Output |
|
HDMI 1, 2, 3 |
0 1 |
false true |
0 1 |
Output |
|
Select |
||||
|
AV 1, 2, 3 |
0 1 |
false true |
0 1 |
Input / Output |
|
Follow HDMI Output 1 |
0 1 |
false true |
0 1 |
Input / Output |
|
Graphic 1, 2, 3 |
0 1 |
false true |
0 1 |
Input / Output |
|
HDMI 1, 2, 3 |
0 1 |
false true |
0 1 |
Input / Output |
|
Mediacast In n |
0 1 |
false true |
0 1 |
Input / Output |
Garbled video when switching AV sources
If your design contains an NV-32-H Encoder that is multicasting to multiple NV-32-H Decoders, you may experience temporary (1-4 seconds) garbled video when switching AV sources. This is due to improper IGMP settings on the network switch. You must enable the IGMP "fast-leave" option.
Refer to the Multicast Traffic topic for other IGMP requirements for network switches.
Mediacast is not a selectable source for HDMI Output 2
This is by design. Only HDMI Output 1 supports Mediacast streams. HDMI Output 2, even when the source is set to Follow H1, does not support Mediacast streams, See Supported Q-SYS Hardware.
Error message when selecting Follow H1 on HDMI Output 2 when HDMI Output 1 is showing a Mediacast source
This is also by design. HDMI Output 2 cannot display a Mediacast source via Follow H1.
Mediacast camera stream stretches to fit the screen (not letter-boxed)
This is normal. Mediacast camera streams are natively 1080p with a 16:9 aspect ratio. On a non-16:9 display, the stream will fill the screen and will not be letter-boxed.
Auto Privacy mode is not working with a camera sending a Mediacast camera stream to an NV-32-H
This is normal. If a camera's Mediacast Output pin is connected to both a downstream USB Video Bridge and HDMI I/O Mediacast Input pin, whether directly or through a Mediacast Router, Auto Privacy in the USB Video Bridge is not supported. Manual privacy is supported, however.
