Initial Discovery and Configuration
This topic discusses how to initially discover a Q-SYS Core processor and configure its IP settings.
After a Q-SYS system is installed, you gain access to Q-SYS Core processors and peripherals through Q-SYS Designer software. Every Ethernet port on a Q-SYS Core processor supports either a switched or direct connection to a PC for configuration, troubleshooting, and maintenance purposes.
Note: To discover or interact with Q-SYS peripheral devices, you must connect your PC to the same Ethernet switch as the Q-SYS peripherals. Direct connection with Q-SYS peripherals is not supported.
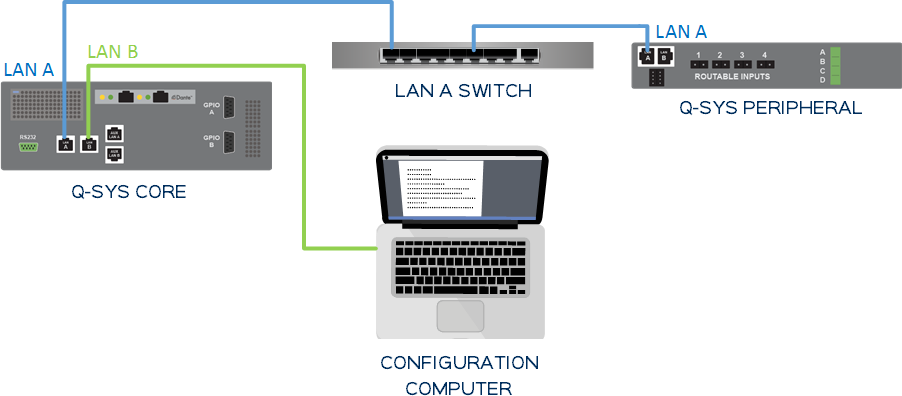
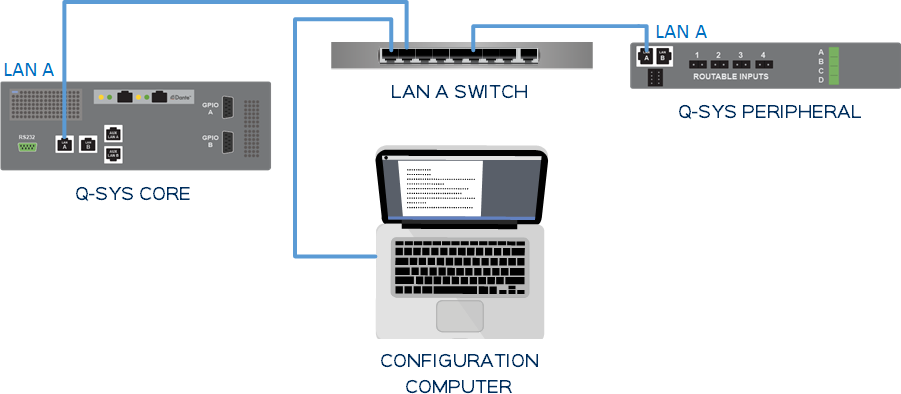
The following diagrams show both the direct and Ethernet switch connection methods.
Direct Connection of PC to Q-SYS Core
In this configuration, the PC is connected directly to the Q-SYS Core processor via the LAN B interface. (A direct connection via the AUX LAN interfaces is also possible.) The PC can connect to and configure only the Q-SYS Core processor. No direct connection with Q-SYS peripheral devices is possible.

Switched Connection of PC to LAN A Network
In this configuration, the PC is connected to the Q-SYS Core processor via the LAN A network through a switch. The PC can interact with each device on the network.

The Q-SYS Discovery Protocol (QDP) uses multicast packets to discover Q-SYS Core processors, including across subnets. By default, Q-SYS devices are set to obtain their IP addresses via DHCP. It there is no DHCP server on the network, the unit uses an Automatic Private IP Address (APIPA, or 'Link Local') with the following parameters:
- IP Range: 169.254.1.1-169.254.254.254
- Subnet Mask: 255.255.0.0 (169.254.0.0/16 in CIDR notation)
Note: You do not need to set your computer's TCP/IPv4 properties to use a static IP within this range for the initial connection.
To initially discover the Q-SYS Core processor:
- Connect the configuration computer to either the LAN A or LAN B network.
- Set your computer's IP and DNS parameters to DHCP ("Obtain an IP address automatically"). If your computer is directly connected to the Q-SYS Core processor, it uses an APIPA address in the same range as the Q-SYS Core.
- Open Q-SYS Designer.
- Go to Tools > Show Q-SYS Configurator. Your unconfigured Q-SYS Core, as well as any other discovered Q-SYS devices, appear in the list.
- Select the Core name. For Cores running Q-SYS 8.0 and above, click the Configuration Page link to open Q-SYS Core Manager.
Note: An unconfigured Q-SYS Core (with an "Idle" design) does not route audio from any input to any output.
If no devices are discovered, multicast traffic might be disabled on your network. Try creating a Hard Link to the Q-SYS Core's IP address. See Remote Connectivity.
Use Core Manager to configure access control, set a new Core name, and configure network interface IP settings.
Hostname
In deployments with multiple Q-SYS devices, device names must be unique.
Mode
Check with the site IT administrator to determine whether DHCP ('Auto' mode) or fixed ('Static' mode) addressing is required.
Note: In either mode, each Q-SYS interface (LAN A, LAN B, etc.) must not be assigned addresses within the same subnet. If you do not have a redundant network, set the mode for LAN B to 'Off'.
IP Address
In 'Auto' mode, this is determined automatically. In 'Static' mode, specify an IP address as determined by site network requirements.
Note: If you set a static IP address, you must then change your configuration computer's subnet to the same subnet as the Q-SYS Core to complete the configuration.
Net Mask
In 'Auto' mode, this is determined automatically. In 'Static' mode, specify a netmask as determined by site network requirements.
Gateway
In 'Auto' mode, this is determined automatically. In 'Static' mode, specify a gateway (if applicable) as determined by site network requirements. Note the following guidelines:
- Specifying a gateway is only required if the Q-SYS Core must communicate through a router to devices outside the LAN.
- Do not specify more than one gateway for a single network interface (LAN A, LAN B, etc.).
- If routing is required on other interfaces, add Static Routes to define what subnets are routed to what gateway.
To successfully save a design file to a Q-SYS Core, you must configure the design file to communicate with the specific name of that Q-SYS Core.
- Within the Inventory pane (left side), select the Q-SYS Core. (In a new design file, the default name is "Core-1".)
- Within the Core Properties pane (right side), type the Name and select the correct Model of the Q-SYS Core. The name must exactly match what you specified in Q-SYS Core Manager.
Note: For naming conventions, as well as information about other Q-SYS Core properties, see Core Properties.
- Select File > Save to Core & Run to deploy your design file.
A configured Q-SYS Core processor should be reachable by at least one IP address and should already be running a design file.
- On the Q-SYS Core front panel, press the Next button until the IP Address and Netmask information appears.
- Set your configuration computer IP to use the same subnet as the Q-SYS Core, ensuring that the IP address you choose is not already in use on the network.
- In Q-SYS Designer, go to File > Load from Core & Connect, and then select the design file running on the Q-SYS Core.
- If the design name appears in red text in the 'Load from Core & Connect' dialog, or the Core status shows as "Unable to contact device" in Q-SYS Configurator, this means that the maintenance computer's network settings are not configured to be on the same subnet as the Q-SYS Core.
- If the design name is not shown in the 'Load from Core & Connect' dialog and the Q-SYS Core is not shown in Q-SYS Configurator, this means that multicast traffic may be disabled on the network. In this case, you can configure a Hard Link to the Q-SYS Core's IP address. See Remote Connectivity.
