Certificates
To meet organization security requirements, you can install a device certificate – signed by the organization's certificate authority (CA) – to each Q-SYS Core and peripheral. CA-signed device certificates allow for trusted connections between Cores, peripherals, and PCs accessing those devices on the network.
Note: Certificates must be PEM-encoded (ASCII, base64).
Prerequisites
- Before proceeding, obtain the contact information for your organization's CA. This is usually someone in the IT department responsible for network security requirements.
- Before installing a certificate on an NV-32-H, ensure that the peripheral has already been added to a Q-SYS design deployed to the Core.
- Use Q-SYS Core Manager to install device certificates on Q-SYS Core processors.
Install Certificate
When you click on the "Install Certificate" button, you are presented with two options to install a certificate:
- Copy the Certificate Code: This option allows you to paste the certificate text directly into the field provided.
- Upload Trusted Certificate: This option allows you to upload the device's own certificate or trusted certificate.
Removing a Certificate
Only one certificate can be installed at a time. If you need to remove the current certificate and install a new one:
- Click the Device Certificate tab.
- Click Remove Certificate.
- Click Remove and Reboot to confirm.
Installed Certificate
Any installed certificate provides the following information:
- Issued To: This field specifies the Q-SYS device to which the certificate is being issued. It includes details like the device's Common Name (CN).
- Issued By: This field indicates the common name (CN) of the device from which the certificate was originally issued.
- Fingerprints: These provide a unique identifier for the certificate in the form of a hash value, ensuring that the certificate is unchanged and authentic.
- Additional Info: This indicates the Certificate Authority (CA) that has issued the certificate. The CA is responsible for verifying the identity of the entity for which the certificate was issued.
- Validity Period: The time frame during which the certificate is valid and trusted. It includes a start and an expiration date.
- X509v3 Extensions: These are additional fields within the certificate that provide extra information, such as key identifiers or usage constraints.
- Public Keys (PEM): The public key is a part of the encryption process and is used to encrypt data. It is paired with a private key (not shown on the certificate) that decrypts the data.
- Device Certificate (PEM): This refers to the actual document certifying the authenticity of the device within the network, containing the above details and adhering to the X.509 standard used for managing Public Key
To begin, click the Generate CSR tab. Follow one of these procedures, depending on your and the CA's requirements:
Generate a CSR and install a device certificate on a single Q-SYS peripheral.
Follow this method when you need to install a device certificate on a single Q-SYS peripheral and the CA does not have any specific requirements for the request.
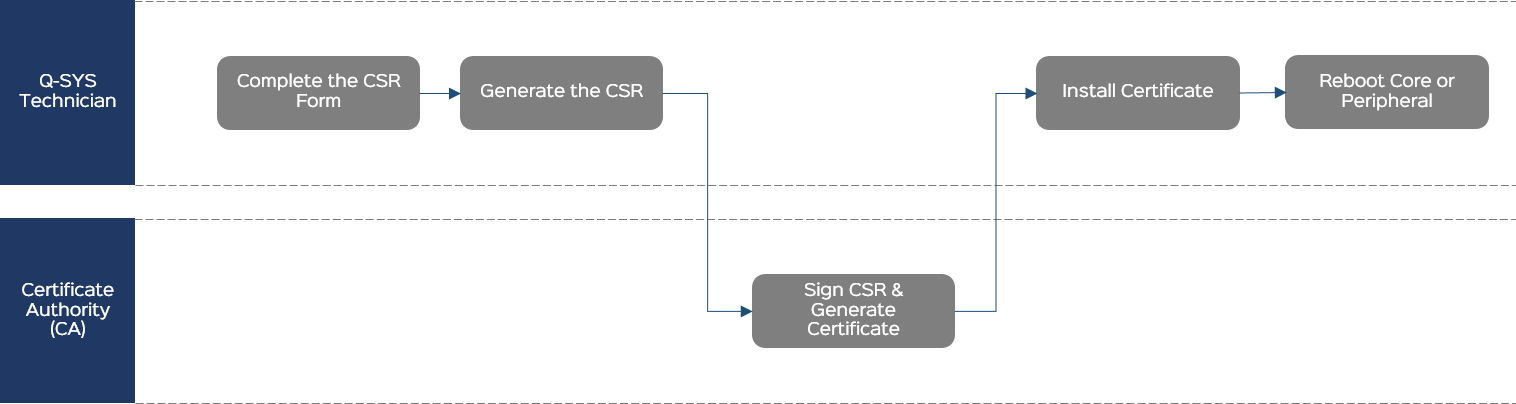
Complete the CSR Form
General
- Country (C): From the menu, select the country in which this peripheral is located.
- Common Name (CN): This is prepopulated with the name of the peripheral as specified in Q-SYS Configurator. Unless you intend to change the name of the peripheral after the certificate is generated, leave this as-is. Note that if you change the Common Name from the default, you must also change it in the DNS Names field.
- Optionally specify the peripheral's State or Province (ST), Locality (L), Organization (O), and Organizational Unit (OU). (Some of these fields might be prepopulated based on the detected location.)
- Optionally specify a contact Email address.
IP Addresses
- Specify the IP address for each of the peripheral's LAN interfaces. This is prepopulated with the detected information and normally should not change.
Note: These should be static IP addresses, as DHCP addresses are subject to change. If an address changes, the certificate will be invalid.
- Leave the DNS Names section as-is unless you have modified the Common Name (CN), in which case you must change it to the modified name.
RSA Key Size
Select a key size for the certificate: 2048, 3072, or 4096. Your CA can provide guidance for this based on organization security requirements.
Note: Q-SYS QIO Series peripherals support RSA-2048 key size and SHA-1 or SHA-256 hash only.
Additional
- In the Challenge Password field, optionally create a challenge password for the request, which can prevent interception of the CSR by a 3rd-party. Some CAs may require this.
- Leave CA:TRUE unselected.
Generate the CSR
- Click Generate CSR.
- Copy the CSR content to a .txt file named Peripheral-Name-CSR.txt and save the text file to an accessible location.
- Send the CSR file to the CA.
Sign the CSR and Generate the Certificate
The CA generates a signed certificate in a similar format and sends it back to you. This could be in the body of an email or a simple .txt file.
Install the Certificate
- Click the Device Certificate tab.
- Click Install Certificate.
- Paste the certificate text or click Upload Certificate to select a text file to upload.
- Click Install.
Note: Only one certificate can be installed at a time.
Reboot
From Q-SYS Configurator, reboot the Q-SYS peripheral for the certificate to take effect.
After the peripheral reboots, the signed certificate will be active. You may need to clear your browser cache so that the HTTPS connection to the peripheral's IP address is reestablished using the new certificate.
CAUTION: The installed certificate is destroyed during a peripheral factory reset.
Generate a CSR for one Q-SYS peripheral and then use it as a template to generate CSRs for additional peripherals.
Follow this method when you need to install a device certificate on multiple Q-SYS peripherals and the CA does not have any specific requirements for the request.
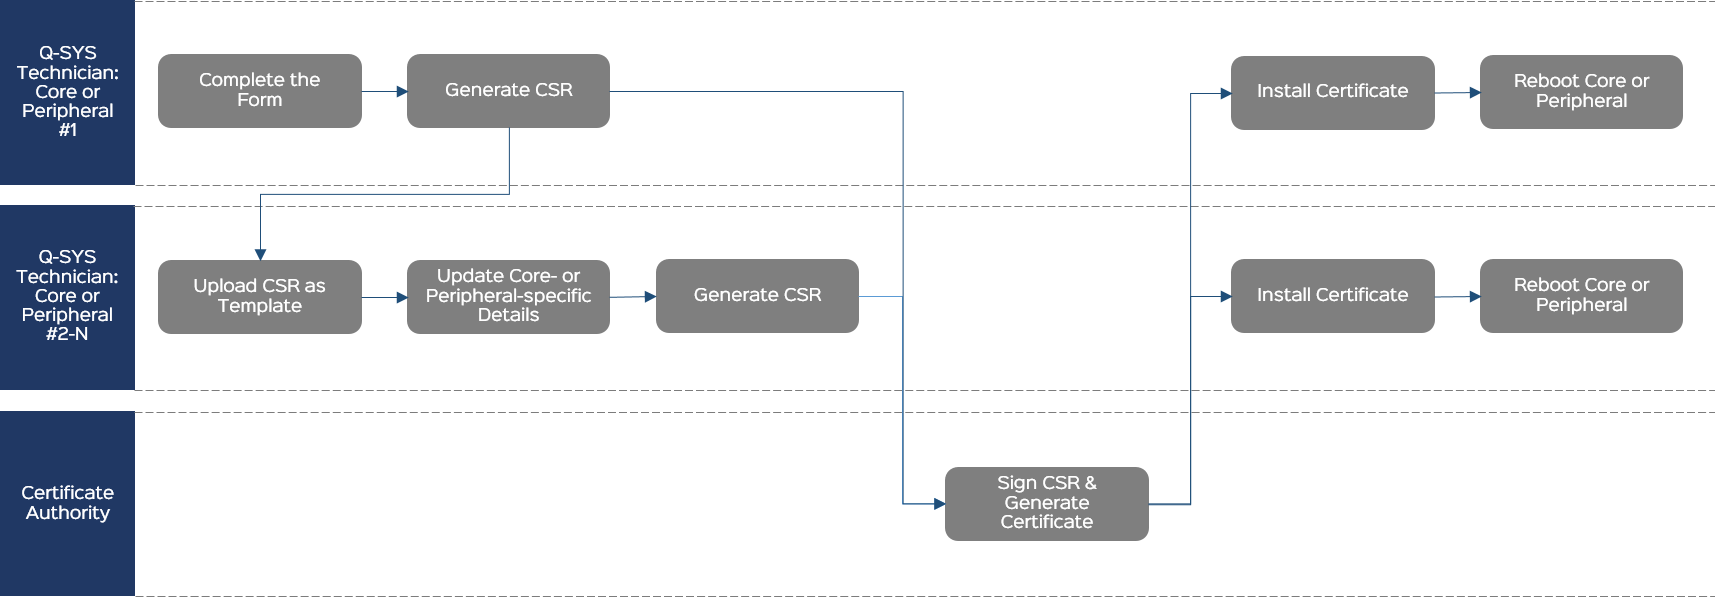
Complete the CSR Form
General
- Country (C): From the menu, select the country in which this peripheral is located.
- Common Name (CN): This is prepopulated with the name of the peripheral as specified in Q-SYS Configurator. Unless you intend to change the name of the peripheral after the certificate is generated, leave this as-is. Note that if you change the Common Name from the default, you must also change it in the DNS Names field.
- Optionally specify the peripheral's State or Province (ST), Locality (L), Organization (O), and Organizational Unit (OU). (Some of these fields might be prepopulated based on the detected location.)
- Optionally specify a contact Email address.
IP Addresses
- Specify the IP address for each of the peripheral's LAN interfaces. This is prepopulated with the detected information and normally should not change.
Note: These should be static IP addresses, as DHCP addresses are subject to change. If an address changes, the certificate will be invalid.
- Leave the DNS Names section as-is unless you have modified the Common Name (CN), in which case you must change it to the modified name.
RSA Key Size
Select a key size for the certificate: 2048, 3072, or 4096. Your CA can provide guidance for this based on organization security requirements.
Note: Q-SYS QIO Series peripherals support RSA-2048 key size and SHA-1 or SHA-256 hash only.
Additional
- In the Challenge Password field, optionally create a challenge password for the request, which can prevent interception of the CSR by a 3rd-party. Some CAs may require this.
- Leave CA:TRUE unselected.
Generate the CSR for the First Peripheral
- Click Generate CSR.
- Copy the CSR content to a .txt file named Peripheral-Name-CSR.txt and save the text file to an accessible location.
- Send the CSR file to the CA.
Upload the CSR as a Template for the Next Peripheral
On another Q-SYS peripheral:
- From the Certificates > Generate CSR tab, click Upload CSR as Template.
- Select and open the CSR text file you created previously.
Update Peripheral-specific Details
The CSR form fields pre-populate with the required information.
Verify that the Common Name (CN), IP Addresses, and DNS Names are all correct for this Q-SYS peripheral. If there are any changes required, modify those fields now.
Generate the CSR
- Click Generate CSR.
- Copy the CSR content to a .txt file named Peripheral-Name-CSR.txt and save the text file to an accessible location.
- Send the CSR file to the CA.
Sign the CSR and Generate the Certificate
The CA generates a signed certificate in a similar format and sends it back to you. This could be in the body of an email or a simple .txt file.
Install the Certificate
- Click the Device Certificate tab.
- Click Install Certificate.
- Paste the certificate text or click Upload Certificate to select a text file to upload.
- Click Install.
Note: Only one certificate can be installed at a time.
Reboot
From Q-SYS Configurator, reboot the Q-SYS peripheral for the certificate to take effect.
After the peripheral reboots, the signed certificate will be active. You may need to clear your browser cache so that the HTTPS connection to the peripheral's IP address is reestablished using the new certificate.
CAUTION: The installed certificate is destroyed during a peripheral factory reset.
If required by the CA, upload a CSR template as a starting point for generating the CSR for one or more Q-SYS peripherals.
Follow this method to request a CSR from the CA that includes additional information for the peripheral that may not be visible on the Generate CSR form.
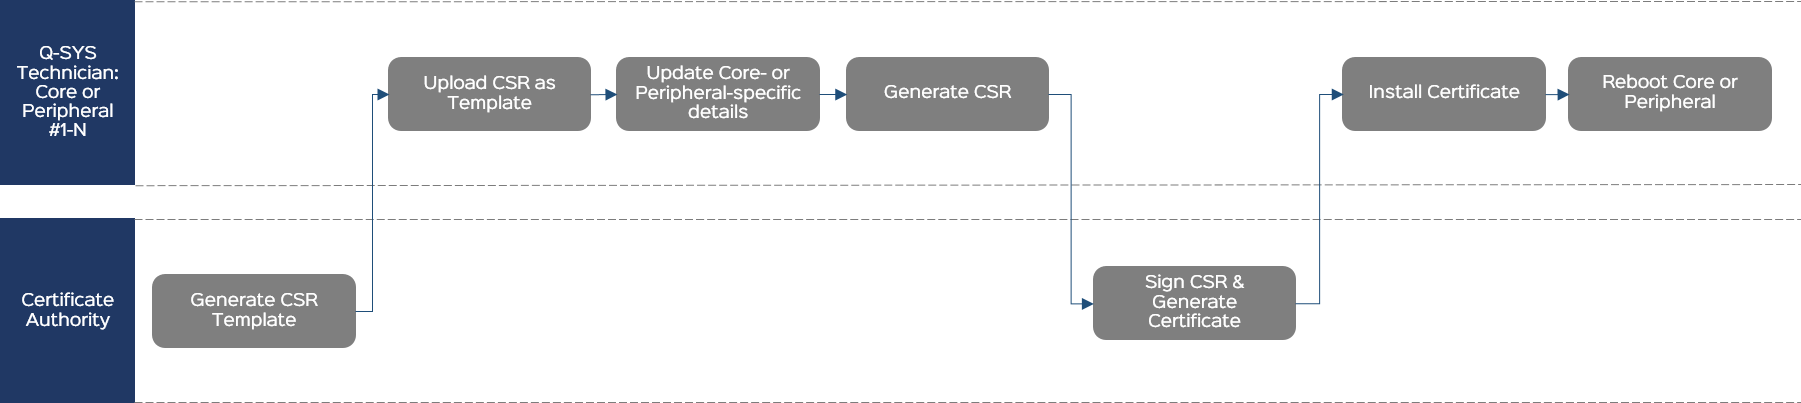
Generate CSR Template
The CA generates a certificate that becomes a template for your request. The CA sends it to you.
Upload the CSR as a Template
- From the Certificates > Generate CSR tab, click Upload CSR as Template.
- Select and open the CSR text file from the CA.
Update Peripheral-specific Details
The CSR form fields pre-populate with the required information.
Note: The form will not show any additional, CA-required information that does not conform to the form structure. This information is hidden and will be included when you generate the CSR.
Verify that the Common Name (CN), IP Addresses, and DNS Names are all correct for this Q-SYS peripheral. If there are any changes required, modify those fields now.
Generate the CSR
- Click Generate CSR.
- Copy the CSR content to a .txt file named Peripheral-Name-CSR.txt and save the text file to an accessible location.
- Send the CSR file to the CA.
Sign the CSR and Generate the Certificate
The CA generates a signed certificate in a similar format and sends it back to you. This could be in the body of an email or a simple .txt file.
Install the Certificate
- Click the Device Certificate tab.
- Click Install Certificate.
- Paste the certificate text or click Upload Certificate to select a text file to upload.
- Click Install.
Note: Only one certificate can be installed at a time.
Reboot
From Q-SYS Configurator, reboot the Q-SYS peripheral for the certificate to take effect.
After the peripheral reboots, the signed certificate will be active. You may need to clear your browser cache so that the HTTPS connection to the peripheral's IP address is reestablished using the new certificate.
CAUTION: The installed certificate is destroyed during a peripheral factory reset.
Secure Communication
Q-SYS communication between Cores and Peripherals can be secured by encryption and mutual authentication using X.509 certificates. Secure mode of communication applies to the two types of connections:
Control Connections: Involving design controls.
Device-to-Device Web Connections: Including design deploy, firmware update, device status, etc.
Note: At this time, we do not recommend enabling this feature on systems with more than 64 Peripherals. This limit will be removed in the next patch release.
Certificate Management
Each Q-SYS device maintains its certificate and three specific lists of certificates to manage security:
- Trusted certificates: Devices that are allowed to communicate with this device.
- Pending certificates: Devices that have submitted their certificates to this device for approval to communicate.
- Declined certificates: Devices that are explicitly disallowed to communicate with this device.
In addition to certificate management through automatic and manual processes, you can manage all types of certificates. Certificates that meet automatic approval criteria are added to the trusted list, while those requiring manual approval appear on the pending list. Pending certificates can then be manually approved or declined. Certificate management actions include:
- Upload Certificate: This involves either pasting the certificate text or selecting a text file to upload. Only certificates that are considered trusted can be uploaded to the Q-SYS Core, ensuring secure communication.
- Decline Certificate: The action of blocking a certificate deemed to be compromised.
- Remove Certificate: This action involves removing the selected certificate(s).
Mutual Authentication Process
In secure mode two devices can communicate securely if they can mutually authenticate. For two devices to communicate securely:
- The device must find the peer’s certificate on its trusted list.
- The peer must prove ownership of the private key associated with the offered certificate.
Automatic and Manual Certificate Management
- In certain configurations, certificates can automatically be added to the trusted list. By default, the Core’s trusted list includes all Peripheral certificates, and each Peripheral automatically trusts the Core’s certificate (or both in a redundant Core pair). This allows Cores and Peripherals to establish trust seamlessly without user intervention.
- If automatic trust isn’t possible, the peer's certificate is added to the pending list for manual approval by the user. Once a Peripheral’s list includes at least one certificate, it switches to secure mode, restricting communication to only the associated Core.
- Certificates found on, or chaining to those on, the declined list are denied communication capabilities and won’t be added to the pending list.
Management of Redundant Core Pairs
- Cores in a redundant pair must first establish mutual trust with each other.
- Only after mutual trust is established will both Core certificates be shared with Peripherals, allowing Peripherals to trust both Cores.
- Update the firmware on all Q-SYS devices to version 10.0 (or higher) to support secure communication.
- Install the required certificates on the Core and Peripherals. If no new certificates are installed, the currently installed ones will be used. Refer to the section Generate CSR for instructions on installing certificates.
- Set up Access Control of all Cores and all Peripherals. For more details, see Access Management > Users in Core Manager and Device Password in Peripheral Manager.
Note: Since primary and backup (redundant) Cores automatically sync, ensure Access Control is enabled on the backup Core.
- Configure trust options:
- Trust On First Usage (TOFU):
- Peripheral: A Peripheral with TOFU enabled will automatically add a Core's certificate to its trusted list if the list is empty. Once secured, the Peripheral requires manual approval for any new Core certificates via Peripheral Manager.
- Core: The Core adds each Peripheral's certificate to its trusted list automatically. If a Peripheral device is swapped but retains the same name, manual approval for the new certificate is needed through Core Manager.
- Rollover: (Disabled in the Core by default). This option, enabled by default on Peripherals but not on the Core, facilitates automatic replacement of certificates, avoiding need for manual approvals when a certificate is updated.
- Trust On First Usage (TOFU):
- Further secure communication of your Q-SYS setup:
- Select 'Control Server Authentication' to enforce certificate-based authentication for server connections. (Note: This may disable control connections from external UCI viewer apps).
- Disable non-authentication supporting network services:
- Navigate to Network > Services > Management and disable the following services:
- Q-SYS External Control Protocol - ASCII
- Q-SYS Remote Control Protocol - JSONRPC
- Navigate to Network > Services > Management and disable the following services:
- Consider certificate expiration by checking the 'Verify Validity Period' to block expired certificates from authenticating.
- Click the 'Enable Secure Communication' button in the Core to initiate secure mode.
- Ensure secure connections are established between Cores and Peripherals. If automatic trust does not apply, review pending certificates and verify their authenticity by comparing fingerprints. See Certificate Management for more information.
To ensure Core and Peripherals engage in trusted relationship, visit the Troubleshooting section.
Notes:
- Once secure mode is activated, you cannot remove the device password without first disabling secure mode.
- The automatic rollover may fail if device is installed a new certificate while its peer was offline. Manual approval of certificate is required when rollover fails.
- For inter-design communications, manual certificate exchanges are necessary to gaining trust.
- Security configuration options are synced between active and backup Cores: user can change the security configuration in the active Core only. Trusted lists of certificates are synced between active and backup Cores: only the certificates of the currently running design are exchanged between the Cores. At all times the active Core makes sure trusted Peripherals trust the backup Core as well.
- Disabling both TOFU and Rollover is advised if there is any perceived security threat during deployment.
- In a setup with two Cores with Secure Communication enabled on only one, if a peripheral is added to both designs, the Core with Secure Communication will establish connection while the other Core will show: Authentication failure.
- To disable secure communication, click on the 'Disable Secure Communication' button in the Core settings. This action prompts the Core to attempt to remove its certificate from the Peripherals. By clearing the Peripheral's trusted list, the device will revert to a non-secure mode of communication.
- If some Peripherals do not switch to the non-secure mode automatically, manually clear their trusted lists. In scenarios where a Peripheral trusts devices beyond the current Core (or redundant Core pair), the current Core will not revoke certificates from the Peripheral. Manually removing trust for the Peripheral may be required, considering its trust relationships with other Cores, to ensure security consistency across different Q-SYS setups.
Note: If planning to downgrade the Q-SYS system to firmware that does not support secure communication, ensure that security mode is disabled in the Core, and all Peripheral trusted lists are cleared. A Core using firmware that does not support secure communication will fail to connect with Peripherals still operating in secure mode.
WARNING: In a redundant system, ensure that primary and secondary core certificates are trusted for stable communication across the system.
When devices don't trust each other a control connection cannot be made. In this case a device's status indicates 'Fault - Authentication Failure'. A Core's log can be examined for the error messages explaining nature of authentication failure with respect to each device. Possible reasons of 'Authentication Failure' status:
- Device has no user password set, secure mode of communication is not available for this device. Please make sure that both redundant Cores have access control enabled and all Peripherals have a user password set.
- Offered certificate is pending manual user approval in the Core or Peripheral. Please use Core Manager and Peripheral Manager of corresponding devices: review the list of pending certificates and approve trust after confirming the certificate’s fingerprint is correct.
- Offered certificate is declined by the Core or the Peripheral. Please review declined certificates in Core Manager and Peripheral Manager of and consider removing declined certificate(s) added there by mistake.
- Offered certificate has expired. Please re-generate and install new certificate in the device with expired certificate.
- Establishing trust with the Peripherals is pending until redundant pair of Core's establish trust with each other. Please make sure redundant pair Cores trust each other. Once trust is established between the Cores this unblocks trust establishment with the Peripherals.