Network > Certificates
Overview
Certificates are used in Q-SYS to establish secure, authenticated communication between devices and with external services. Q-SYS Core Manager provides two workflows for uploading certificates—Device Certificate and Trusted CA Certificate. Device Certificates require both a certificate, as well as a private key. The purpose is to ensure the device’s own identity. In contrast, a Trusted CA Certificate only requires a certificate, where its purpose is to trust other devices or services signed by the CA.
This page explains how to upload, manage, troubleshoot device certificates, and offers a brief description of the tabs you’ll see in the Certificate’s node of Core Manager.
More information on Secure Communication and managing Trust Relationships between devices can be found here Network > Secure Communication.
- Before proceeding, obtain the contact information for your organization's CA. This is usually someone in the IT department responsible for network security requirements.
- Use Q-SYS Peripheral Manager to install device certificates on Q-SYS peripheral devices. Peripheral Manager is accessible from the Q-SYS Configurator > Device Security button for each peripheral.
Security Implications and Best Practices
Security
-
Private Key Security: Never share or expose your private key. If compromised, any device with the key can impersonate your system.
-
Wildcard Certificates : Using a wildcard certificate simplifies management, but increases risk—if the wildcard private key is leaked, all devices using it are vulnerable.
-
Internal CA Trust: Only upload certificates from a trusted internal CA. Improper CA management can allow unauthorized devices to join your secure network.
-
Certificate Replacement :Replacing a certificate will break trust with all devices that have not yet received the new certificate. Plan replacements during maintenance windows.
Best Practices
-
Use strong, unique passwords for all device management interfaces.
-
Store private keys securely and restrict access to authorized personnel only.
-
Document all certificate changes for audit and troubleshooting purposes.
Which Scenario Applies to You?
-
I need to upload a new certificate and key:
Go to Uploading Certificates .
-
I need to replace an existing certificate:
-
I’m troubleshooting certificate errors:
Jump to Troubleshooting Certificate Errors.
Uploading Certificates
Device Certificate – Requires Private Key
-
This is the certificate and private key pair that uniquely identifies the Q-SYS device itself.
-
Both the certificate and the matching private key are required for the device to authenticate itself and establish secure communications.
-
If you are configuring the device’s own identity (so it can prove who it is), upload both the certificate and the matching private key.
Step 1: Prepare Your Certificate Code and Private Key
-
Ensure you have both the certificate code and its matching private key in PEM format.
-
If you need to convert formats, see Converting Certificates to PEM.
Step 2: Choose Upload Method
-
Upload Certificate & Private Key:
a. In Core Manager, go to Network > Certificates > Install > Certificate & Private Key.
b. Click Upload Private Key. Select your key file.
c. Click Upload Certificate. Select your certificate file.
-
Copy/Paste Private Key and Certificate Code
a. In the same section, select the Private Key text box.
b. Paste the PEM-encoded Private Key into the provided field.
c. In the same section, select the Certificate Code text box.
d. Click Install.
Step 3: Verify
-
Confirm the certificate appears in the list and is marked as active.
Note: Certificates must be PEM-encoded (ASCII, base64). For more information, see Converting Certificates to PEM.
Note: The Core Processor does not support wildcard certificates from internal Certificate Authorities (CAs).
Trusted CA Certificate – Certificate Only
-
This is a certificate from a Certificate Authority (CA) that you want the Q-SYS device to trust.
-
Only the certificate is needed—no private key is required or should be provided.
-
This is used to add a CA to the device’s list of trusted authorities, so that the device will trust certificates signed by that CA (for example, to trust other devices or services in your network), then upload only the CA’s certificate.
Step 1: Prepare Your Certificate Code
-
Ensure you have the certificate code
-
If you need to convert formats, see Converting Certificates to PEM.
Step 2: Choose Upload Method
-
Upload Certificate
a. In Core Manager, go to Network > Certificates > Install > Certificate.
b. Click Upload Certificate. Select your certificate file.
-
Copy/Paste Certificate Code
a. In the same section, select the Certificate Code text box.
b. Paste the PEM-encoded Certification Code into the provided field.
c. Click Install.
Note: Certificates must be PEM-encoded (ASCII, base64). For more information, see Converting Certificates to PEM.
Replacing or Removing a Certificate
-
Replacing:
Uploading a new certificate will overwrite the existing one. All devices must trust the new certificate to maintain secure communication. Plan certificate replacements during maintenance windows to avoid service disruption.
-
Removing
Use the Remove Certificate option. The device will revert to its default self-signed certificate, and secure communication may be disrupted until trust is re-established. Be sure to reboot to confirm that the certificate is removed.
Troubleshooting Certificate Errors
Upload failures:
Ensure files are in PEM format and match.
Check for typos or extra spaces in pasted text.
Device not trusted:
Verify the certificate is signed by your internal CA.
Ensure the client device trusts your internal CA.
Authentication errors:
Review trusted, pending, and declined lists for mismatches.
Redundant System:
Ensure that primary and secondary core certificates are trusted for stable communication across the system.
Certificates must be PEM-encoded (ASCII, base64). If your certificate or key is not in PEM format, use the following command (example for OpenSSL):
1 openssl x509 -in yourcert.crt -out yourcert.pem -outform PEM
2 openssl rsa -in yourkey.key -out yourkey.pem -outform PEM
Certificate Tab
Any installed certificate provides the following information:
-
Issued To: This field specifies the Q-SYS device to which the certificate is being issued. It includes details like the device's Common Name (CN).
-
Issued By: This field indicates the common name (CN) of the device from which the certificate was originally issued.
-
Fingerprints: These provide a unique identifier for the certificate in the form of a hash value, ensuring that the certificate is unchanged and authentic.
-
Additional Info: This indicates the Certificate Authority (CA) that has issued the certificate. The CA is responsible for verifying the identity of the entity for which the certificate was issued.
-
Validity Period: The time frame during which the certificate is valid and trusted. It includes a start and an expiration date.
-
X509v3 Extensions: These are additional fields within the certificate that provide extra information, such as key identifiers or usage constraints.
-
Public Keys (PEM): The public key is a part of the encryption process and is used to encrypt data. It is paired with a private key (not shown on the certificate) that decrypts the data.
-
Device Certificate (PEM): This refers to the actual document certifying the authenticity of the device within the network, containing the above details and adhering to the X.509 standard used for managing Public Key Infrastructure (PKI).
Generate CSR Tab
What is a CSR?
A Certificate Signing Request (CSR) is a file generated by your device that contains its public key and identifying information (such as device name, organization, etc.). This file is sent to a Certificate Authority (CA)—either internal or external—so the CA can issue a signed certificate for your device.
Why Generate a CSR from the Core?
• Ensures Key Security
The private key is generated and stays on the Q-SYS Core. Only the public key and identifying information are sent out in the CSR. This means the private key never leaves the device, which is a security best practice.
• Simplifies Certificate Management
By generating the CSR on the device, you avoid manual key generation and transfer steps, reducing the risk of mistakes or key compromise.
• Matches Device Identity
The CSR includes the device’s correct host name, domain, and other details, ensuring the issued certificate will match the device’s identity and network configuration.
To install a certificate, follow one of these procedures, depending on your and the CA's requirements
-
Install a Certificate on a Single Core
Generate a CSR and install a device certificate on a single Core.
-
Install Certificates on Multiple Cores
Generate a CSR for one Core and then use it as a template to generate CSRs for additional Cores.
-
Upload CSR Requirements (Template) from the CA
If required by the CA, upload a CSR template as a starting point for generating the CSR for one or more Cores.
-
Q-SYS communication between Cores and Peripherals can be secured by encryption and mutual authentication using X.509 certificates. Secure modes of communication apply to the two types of connections:
a. Control Connections: Involving design controls.
b. Device-to-Device Web Connections: Including design deploy, firmware update, and device status.
Device Certificate Tab
Install Certificate
When you click on the "Install Certificate" button, you are presented with two options to install a certificate:
- Copy the Certificate Code: This option allows you to paste the certificate text directly into the field provided.
- Upload Trusted Certificate: This option allows you to upload the device's own certificate or trusted certificate.
Remove Certificate
Only one certificate can be installed at a time. If you need to remove the current certificate and install a new one:
- Click the Device Certificate tab.
- Click Remove Certificate.
- Click Remove and Reboot to confirm.
Installed Certificate
Any installed certificate provides the following information:
- Issued To: This field specifies the Q-SYS device to which the certificate is being issued. It includes details like the device's Common Name (CN).
- Issued By: This field indicates the common name (CN) of the device from which the certificate was originally issued.
- Fingerprints: These provide a unique identifier for the certificate in the form of a hash value, ensuring that the certificate is unchanged and authentic.
- Additional Info: This indicates the Certificate Authority (CA) that has issued the certificate. The CA is responsible for verifying the identity of the entity for which the certificate was issued.
- Validity Period: The time frame during which the certificate is valid and trusted. It includes a start and an expiration date.
- X509v3 Extensions: These are additional fields within the certificate that provide extra information, such as key identifiers or usage constraints.
- Public Keys (PEM): The public key is a part of the encryption process and is used to encrypt data. It is paired with a private key (not shown on the certificate) that decrypts the data.
- Device Certificate (PEM): This refers to the actual document certifying the authenticity of the device within the network, containing the above details and adhering to the X.509 standard used for managing Public Key Infrastructure (PKI).
To install a certificate, follow one of these procedures, depending on your and the CA's requirements:
Generate a CSR and install a device certificate on a single Core.
Follow this method when you need to install a device certificate on a single Q-SYS Core processor and the CA does not have any specific requirements for the request.
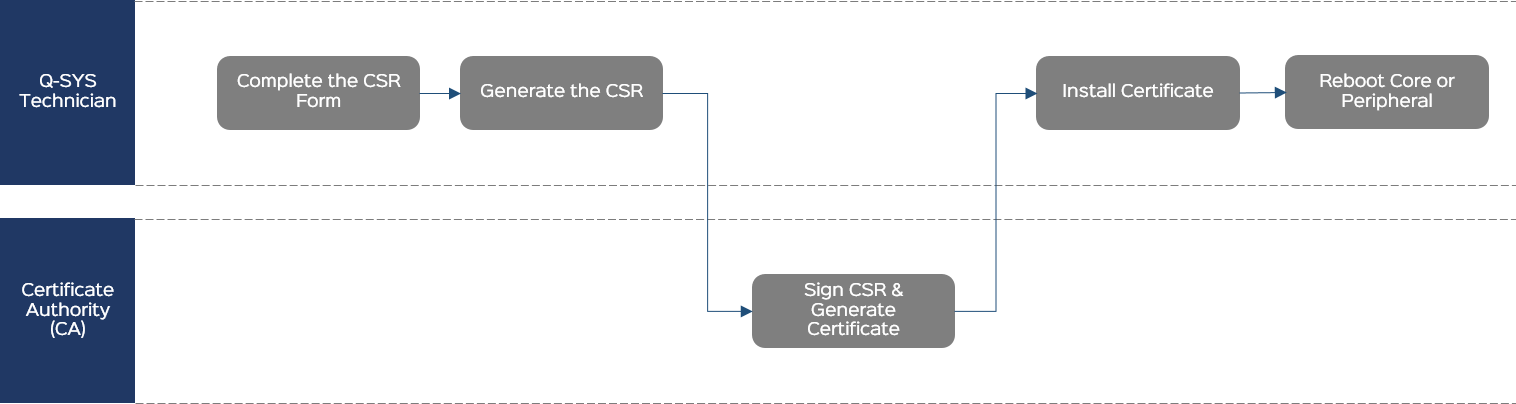
Complete the CSR Form
General
- Country (C): From the menu, select the country in which this Core is located.
- Common Name (CN): This is prepopulated with the name of the Core as specified in Core Manager > Network Settings. Unless you intend to change the name of the Core after the certificate is generated, leave this as-is. Note that if you change the Common Name from the default, you must also change it in the DNS Names field.
- Optionally specify the Core's State or Province (ST), Locality (L), Organization (O), and Organizational Unit (OU). (Some of these fields might be prepopulated based on the detected location.)
- Optionally specify a contact Email address.
IP Addresses
- Specify the IP address for each of the Core's LAN interfaces. This is prepopulated with the detected information and normally should not change.
Note: These should be static IP addresses, as DHCP addresses are subject to change. If an address changes, the certificate will be invalid.
- Leave the DNS Names section as-is unless you have modified the Common Name (CN), in which case you must change it to the modified name.
RSA Key Size
Select a key size for the certificate: 2048, 3072, or 4096. Your CA can provide guidance for this based on organization security requirements.
Additional
- In the Challenge Password field, optionally create a challenge password for the request, which can prevent interception of the CSR by a 3rd-party. Some CAs may require this.
- Leave CA:TRUE unselected.
Generate the CSR
- Click Generate CSR.
- Copy the CSR content to a .txt file named Core-Name-CSR.txt and save the text file to an accessible location.
- Send the CSR file to the CA.
Sign the CSR and Generate the Certificate
The CA generates a signed certificate in a similar format and sends it back to you. This could be in the body of an email or a simple .txt file.
Install the Certificate
- Click the Device Certificate tab.
- Click Install Certificate.
- Paste the certificate text or click Upload Certificate to select a text file to upload.
- Click Install.
Note: Only one certificate can be installed at a time.
Reboot
From the Utilities page, reboot the Q-SYS Core processor for the certificate to take effect.
After the Core reboots, the signed certificate will be active. You may need to clear your browser cache so that the HTTPS connection to the Core's IP address is reestablished using the new certificate.
CAUTION: The installed certificate is destroyed during a Core factory reset.
Generate a CSR for one Core and then use it as a template to generate CSRs for additional Cores.
Follow this method when you need to install a device certificate on multiple Q-SYS Core processors and the CA does not have any specific requirements for the request.
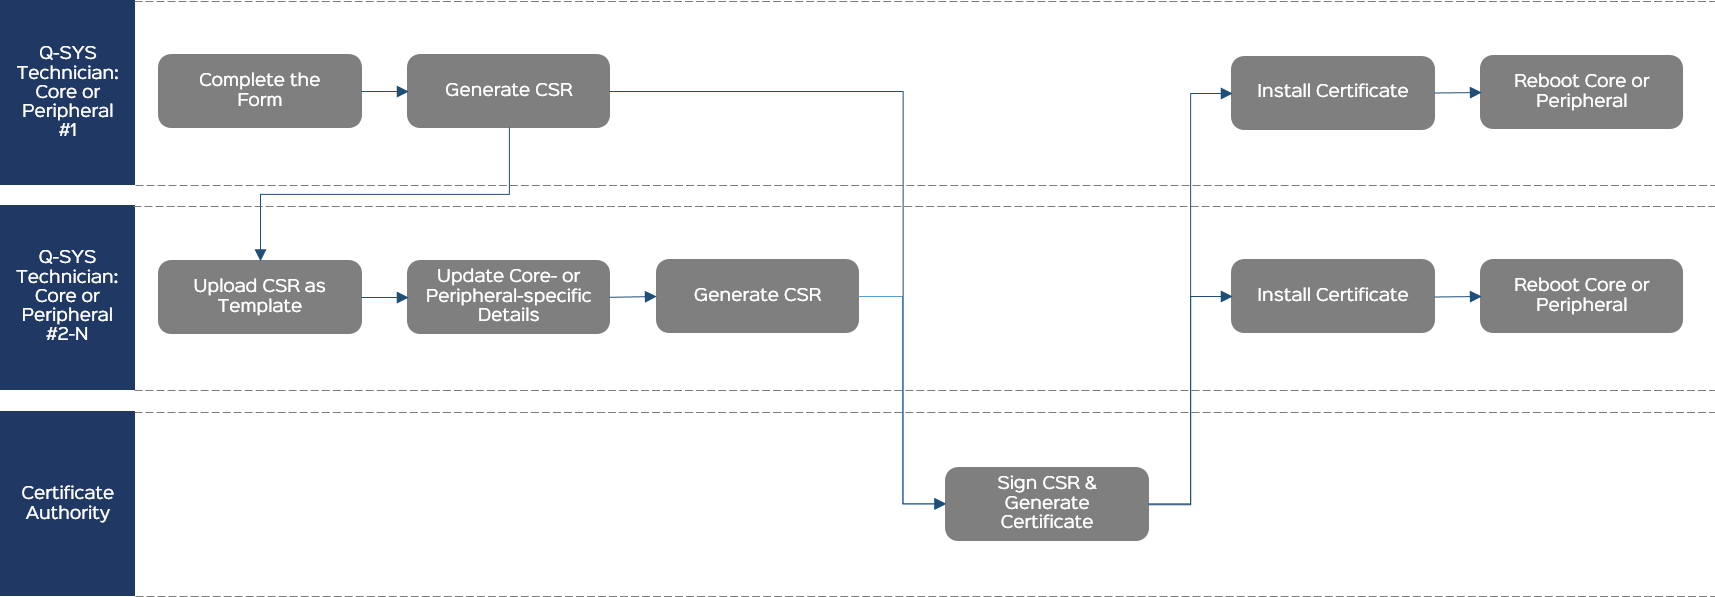
Complete the CSR Form
General
- Country (C): From the menu, select the country in which this Core is located.
- Common Name (CN): This is prepopulated with the name of the Core as specified in Core Manager > Network Settings. Unless you intend to change the name of the Core after the certificate is generated, leave this as-is. Note that if you change the Common Name from the default, you must also change it in the DNS Names field.
- Optionally specify the Core's State or Province (ST), Locality (L), Organization (O), and Organizational Unit (OU). (Some of these fields might be prepopulated based on the detected location.)
- Optionally specify a contact Email address.
IP Addresses
- Specify the IP address for each of the Core's LAN interfaces. This is prepopulated with the detected information and normally should not change.
Note: These should be static IP addresses, as DHCP addresses are subject to change. If an address changes, the certificate will be invalid.
- Leave the DNS Names section as-is unless you have modified the Common Name (CN), in which case you must change it to the modified name.
RSA Key Size
Select a key size for the certificate: 2048, 3072, or 4096. Your CA can provide guidance for this based on organization security requirements.
Additional
- In the Challenge Password field, optionally create a challenge password for the request, which can prevent interception of the CSR by a 3rd-party. Some CAs may require this.
- Leave CA:TRUE unselected.
Generate the CSR for the First Core
- Click Generate CSR.
- Copy the CSR content to a .txt file named Core-Name-CSR.txt and save the text file to an accessible location.
- Send the CSR file to the CA.
Upload the CSR as a Template for the Next Core
On another Q-SYS Core processor:
- From the Certificates > Generate CSR tab, click Upload CSR as Template.
- Select and open the CSR text file you created previously.
Update Core-specific Details
The CSR form fields pre-populate with the required information.
Verify that the Common Name (CN), IP Addresses, and DNS Names are all correct for this Q-SYS Core processor. If there are any changes required, modify those fields now.
Generate the CSR
- Click Generate CSR.
- Copy the CSR content to a .txt file named Core-Name-CSR.txt and save the text file to an accessible location.
- Send the CSR file to the CA.
Sign the CSR and Generate the Certificate
The CA generates a signed certificate in a similar format and sends it back to you. This could be in the body of an email or a simple .txt file.
Install the Certificate
- Click the Device Certificate tab.
- Click Install Certificate.
- Paste the certificate text or click Upload Certificate to select a text file to upload.
- Click Install.
Note: Only one certificate can be installed at a time.
Reboot
From the Utilities page, reboot the Q-SYS Core processor for the certificate to take effect.
After the Core reboots, the signed certificate will be active. You may need to clear your browser cache so that the HTTPS connection to the Core's IP address is reestablished using the new certificate.
CAUTION: The installed certificate is destroyed during a Core factory reset.
If required by the CA, upload a CSR template as a starting point for generating the CSR for one or more Cores.
Follow this method to request a CSR from the CA that includes additional information for the Core that may not be visible on the Generate CSR form.
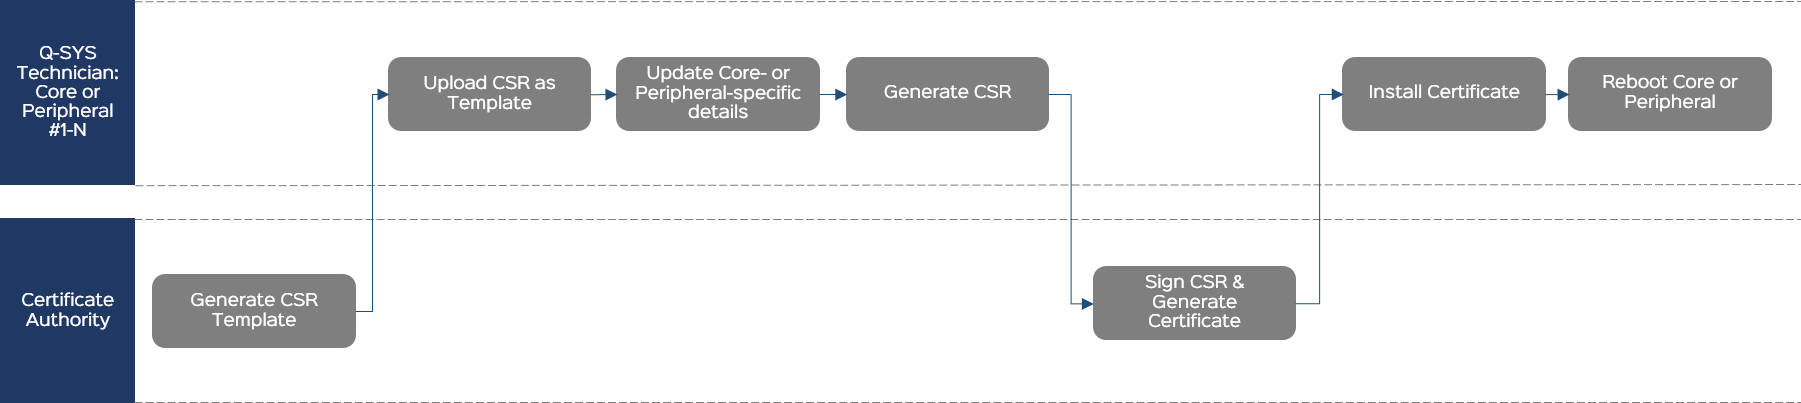
Generate CSR Template
The CA generates a certificate that becomes a template for your request. The CA sends it to you.
Upload the CSR as a Template
- From the Certificates > Generate CSR tab, click Upload CSR as Template.
- Select and open the CSR text file from the CA.
Update Core-specific Details
The CSR form fields pre-populate with the required information.
Note: The form will not show any additional, CA-required information that does not conform to the form structure. This information is hidden and will be included when you generate the CSR.
Verify that the Common Name (CN), IP Addresses, and DNS Names are all correct for this Q-SYS Core processor. If there are any changes required, modify those fields now.
Generate the CSR
- Click Generate CSR.
- Copy the CSR content to a .txt file named Core-Name-CSR.txt and save the text file to an accessible location.
- Send the CSR file to the CA.
Sign the CSR and Generate the Certificate
The CA generates a signed certificate in a similar format and sends it back to you. This could be in the body of an email or a simple .txt file.
Install the Certificate
- Click the Device Certificate tab.
- Click Install Certificate.
- Paste the certificate text or click Upload Certificate to select a text file to upload.
- Click Install.
Note: Only one certificate can be installed at a time.
Reboot
From the Utilities page, reboot the Q-SYS Core processor for the certificate to take effect.
After the Core reboots, the signed certificate will be active. You may need to clear your browser cache so that the HTTPS connection to the Core's IP address is reestablished using the new certificate.
CAUTION: The installed certificate is destroyed during a Core factory reset.