Scriptable Controls
Note: As of Q-SYS Designer version 7.2, the Scriptable Controls component has been deprecated. Older designs that use this component will still function. For new designs, the Text Controller component replaces Scriptable Controls in the Schematic Elements component list.
Scriptable controls are a combination of the commonly used Control Script block and Custom Controls. You can add any number of controls, give them custom names and choose whether to expose those control's pins as inputs, outputs, inputs AND outputs or none. There is also a built-in Lua scripting area (Script v2 only) that can directly access the custom controls. This combination component can save greatly simplify scripts, by only requiring a subset of external control wiring. Controls that are only used to set modes, define IP addresses or baud rates, etc. do not necessarily need to have pins exposed as was always necessary with discrete Script blocks wired to one or more Custom Controls component. Scriptable Controls do not replace the discreet Control Script or Custom Controls components, but provide a potentially simpler interface for housing Lua-scripted solutions.
Scripts written in the Scriptable Controls component can fully utilize every Lua Script v2 feature, including all of the Q-SYS specific libraries, so it is possible to use this component to accomplish any need for scripting in Q-SYS. You could write scripts to control elements entirely within the Q-SYS Designer file or you could use it to interface Q-SYS with third-party hardware accessible via Serial, TCP, UDP or HTTP.
Get Controls Example

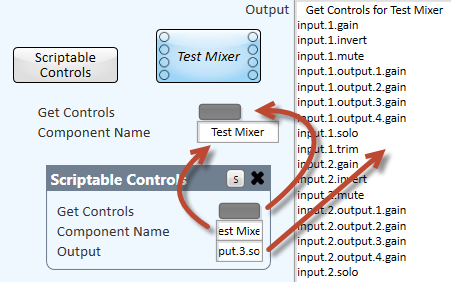
This image shows a Scriptable Controls component with script to retrieve control names from another component. This uses the Script v2 Component library to retrieve the full list of control names that can be used, in turn, to control specific controls within any named component within the design without any wiring. The controls you see in the capture above were copied out of the component (shown by the red arrows). This script is created in the following way:
- Add a Scriptable Controls component from the Control Components category of the Schematic Library on the right pane.
- Click the Edit button in the Scriptable Controls Properties area in the upper right pane:

- You are presented with a dialog box allowing you to create or modify the controls to be contained in the component.
- Click Add Control. Another line is added to the dialog, much like a spreadsheet. On each line, you can change the values to match your intended purpose. You can name the row of controls anything you like with spaces or not, but remember that whatever you call each row of controls will be the name you use to refer to the control(s) within the Lua script. Regarding the name, try to balance the need to describe the control's use and simplicity within the script.
- For each row, in addition to the name representing that row, choose the count of controls, a style, type, Min/Max (if applicable) and Pin Style
- Button
- Knob
- Indicator
- Text
- Momentary
- Toggle
- Trigger
- dB
- Hertz
- Float
- Integer
- Pan
- Percent
- Position
- Seconds
- LED
- Meter
- Text
- Status
- TextBox
- ComboBox
- ListBox
- None
- Inputs
- Outputs
- Both
- Continuing the example, set up the controls this way and click OK:
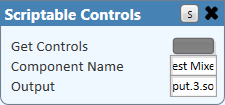
- This will produce Scriptable Controls contents that look like this:
- You may copy out any of these controls to make them easier to read or access. See the first image above for a suggestion.
- Click the
 button in the upper right corner of the dialog to open the script window.
 - Paste in the following code:Copy
Controls["Component Name"].EventHandler = function(ctl)
    comp = Component.New(ctl.String)
end

-- Returns all controls of the component in "Component Name"
Controls["Get Controls"].EventHandler = function()
    local str = "   Get Controls for "..Controls["Component Name"].String.."\r"
    for k,v in pairs(comp) do
        str = str..k.."\r"
    end
    Controls.Output.String = str
end

comp = Component.New(Controls["Component Name"].String) - You can click the yellow bar to save the new script contents and close the script window.
- To allow the script to get controls, add a component and rename it or copy and paste your new Scriptable Controls component into another file (where you must also have at least one component with a custom name).
- You can emulate or deploy the design to allow the script to run.
- In the Component Name textbox, type the exact name of the custom-named component. In our example, there is a 4x4 Matrix Mixer, but it doesn't matter.
- Click the Get Controls button to retrieve the complete list of controls retrieved from the component.


|
||||||||||||||||||||

Note: You can click the black X to the left of any row to completely remove that row. Any new rows are always added to the bottom.

Row Naming Notes
- Names that contain no spaces can be referenced with dotted notation. Examples: 'Button' could be referenced 'Controls.Button.Boolean'; Names with spaces: 'Big Button' = 'Controls["Big Button"].Boolean'
- For rows with a single control, you can directly access the control: Example: 'MyKnob' = 'Controls.MyKnob.Value'
- For rows with at least two controls, you must access the controls as an array: Example: 'MyKnobs' x 3 = 'Controls.MyKnobs[1].Value', 'Controls.MyKnobs[2].Value', 'Controls.MyKnob[3].Value'
- For rows with multiple controls AND spaces must be referenced this way: Example: 'My Knobs' x 2 = 'Controls["My Knobs"][1].Value', 'Controls["My Knobs"][2].Value'
