Network > 802.1X
Enable or disable 802.1X port-based authentication for each of the Q-SYS Core processor's LAN interfaces. Enabling 802.1X for network clients may be a security requirement of the site network to allow authenticated devices to connect.
Note: If 802.1X is a network requirement, you must enable it on the Q-SYS Core processor and all connected Q-SYS peripherals. Use Q-SYS Peripheral Manager (accessible from the Q-SYS Configurator > Device Security button) to enable 802.1X for each Q-SYS peripheral.
Overview
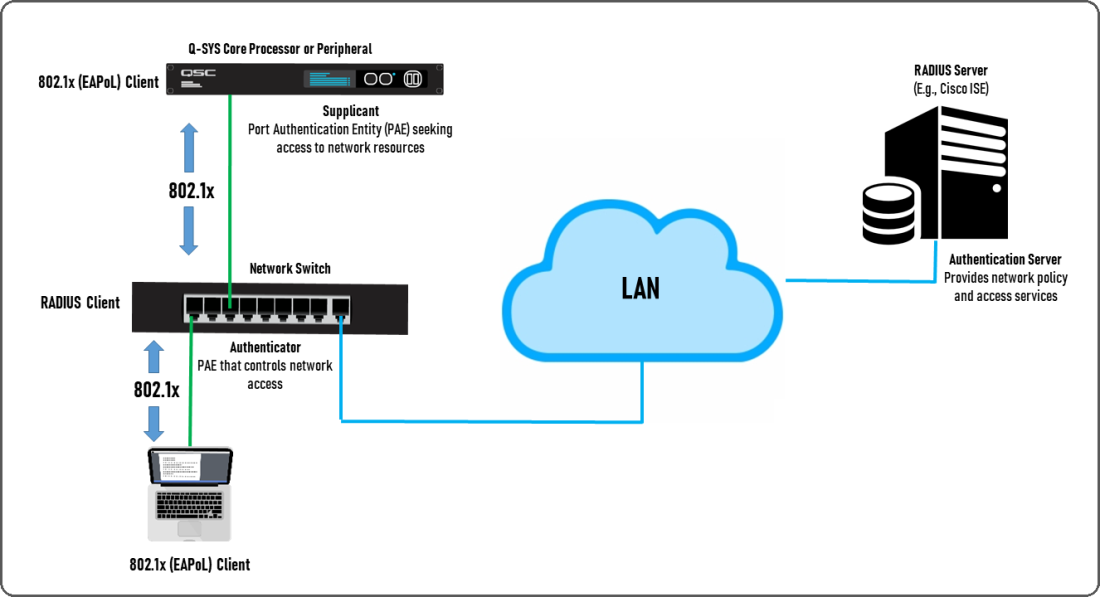
When 802.1X port-based authentication is enabled on the Q-SYS network:
- The Supplicant is a Port Authentication Entity (PAE) that seeks access to the network from an Authenticator. Each Q-SYS network interface (LAN A, LAN B, etc.), whether on a Q-SYS Core or peripheral, is a Supplicant.
- The Authenticator (typically a network switch configured for this role) receives the request from the Supplicant that is sent across the LAN to an Authentication Server.
- The Authentication Server is a RADIUS server that grants or denies access to the Supplicant based on a configured access control list. The Authentication Server commonly runs Cisco Identity Services Engine (ISE) or Windows Radius Server.

Do I need to enable 802.1X?
You only need to enable 802.1X if the network requires it. The site network administrator can advise whether 802.1X is required, as well as the requirements for enabling it.
Enabling 802.1X
Note: Before proceeding, contact the site network administrator to find out the requirements for 802.1X on the network. This includes the type of 802.1X authentication, RADIUS server credentials, and any certificate requirements. When connecting your PC to the same 802.1X port-authenticated network, you must configure its Ethernet adapter to use the same settings – enable 802.1X, select the same authentication method, and so on.
- From the ports list, select a LAN interface.
- Check the Port Status, which should indicate "Link Up". If you see "Link Down", it means that the network interface is either not enabled or the network cable is unplugged. Go to the Network > Basic page to enable the network interface if needed. For more information, see Network > Basic.
- Click Edit.
- Select the 802.1X Enabled box, and then proceed based on the required Authentication type:
PEAP is the most common form of 802.1X authentication. At minimum, you must specify the Identity (Username) and Password credentials on the RADIUS server.
- Anonymous Identity: (Optional) Type an identity to use for initial, unencrypted contact with the RADIUS server – for example, "hello@example".
- Domain: (Optional) Used in conjunction with CA Certificate, the Domain filters the list of certificates to only those that use the specified domain.
- CA Certificate: (Optional) If provided by your network administrator, click Upload to select a PEM-encoded (ASCII, base64) Certificate Authority (CA) certificate text file, which is used to establish trust between the Q-SYS device and the network.
Tip: Typically, the same CA certificate file is used for all devices requiring 802.1X authentication on the network.
- PEAP Version: Version 0 (default) or 1.
- Inner Authentication: MSCHAPV2 (default), GTC, or MD5.
- Identity (Username): The username credential created on the RADIUS server. (Windows administrators create profiles on the RADIUS server that are assignable on each Supplicant.)
- Password: The password credential for the Identity user created on the RADIUS server.
As with PEAP, at minimum, you must specify the Identity (Username) and Password credentials on the RADIUS server.
- Anonymous Identity: (Optional) Type an identity to use for initial, unencrypted contact with the RADIUS server – for example, "hello@example".
- Domain: (Optional) Used in conjunction with CA Certificate, the Domain filters the list of certificates to only those that use the specified domain.
- CA Certificate: (Optional) If provided by your network administrator, click Upload to select a PEM-encoded (ASCII, base64) Certificate Authority (CA) certificate text file, which is used to establish trust between the Q-SYS device and the network.
Tip: Typically, the same CA certificate file is used for all devices requiring 802.1X authentication on the network.
- PEAP Version: Version 0 (default) or 1.
- Inner Authentication: MSCHAPV2 (default), GTC, or MD5.
- Identity (Username): The username credential for the RADIUS server.
- Password: The password credential for the RADIUS server.
TLS authentication requires a device client certificate in addition to the RADIUS server username.
- Identity (Username): The username credential for the RADIUS server.
- Domain: (Optional) Used in conjunction with CA Certificate, the Domain filters the list of certificates to only those that use the specified domain.
- Device Client Certificate (Choose option): Select one of two options:
- Use device client certificate: This option uses the device certificate already installed via the Network > Certificates page (refer to Network > Certificates for more information).
- Use uploaded client certificate: This option prompts you to upload a separate PEM-encoded (ASCII, base64) device Client Certificate and Client Private Key provided by the network administrator specifically for 802.1X.
- CA Certificate: (Optional) If provided by your network administrator, click Upload to select a PEM-encoded (ASCII, base64) Certificate Authority (CA) certificate text file, which is used to establish trust between the Q-SYS device and the network.
Tip: Typically, the same CA certificate file is used for all devices requiring 802.1X authentication on the network.
When you have finished configuring 802.1X authentication, click Save. The Port Status will indicate "Link Up - Connecting", followed by "Link Up - Authenticated".
Note: If you uploaded a Device Client Certificate or CA Certificate, you must reboot the Core for the certificate to take effect.
Troubleshooting
- If you do not see the "Authenticated" status message, double-check that you have precisely specified the correct authentication parameters, including RADIUS server credentials. Consult the site network administrator for guidance.
- If the LAN interface still does not authenticate, try connecting a PC to the network and configure its 802.1X settings the same way. If the PC does not authenticate, either, this may indicate a problem with the network's configuration. Consult your network administrator.
